
9-Step Setup
Connecting your WordPress website to the Conturalis Cloud unlocks the full power of autonomous Web Agents, Smart Data grounding, and real-time component rendering. Follow this exact 9-step setup guide to authenticate your domain and launch your cloud connection.
1. Download the Conturalis WP Plugin
Log in to your Conturalis Portal dashboard. Under the Overview tab, click Download Here to save the core Conturalis WordPress plugin ZIP file to your local device.

2. Access the Conturalis Cloud
Navigate to the Cloud tab in the Portal navigation bar. Here you can review your Prepaid Cloud Wallet, sync connection states, and manage your ecosystem infrastructure.
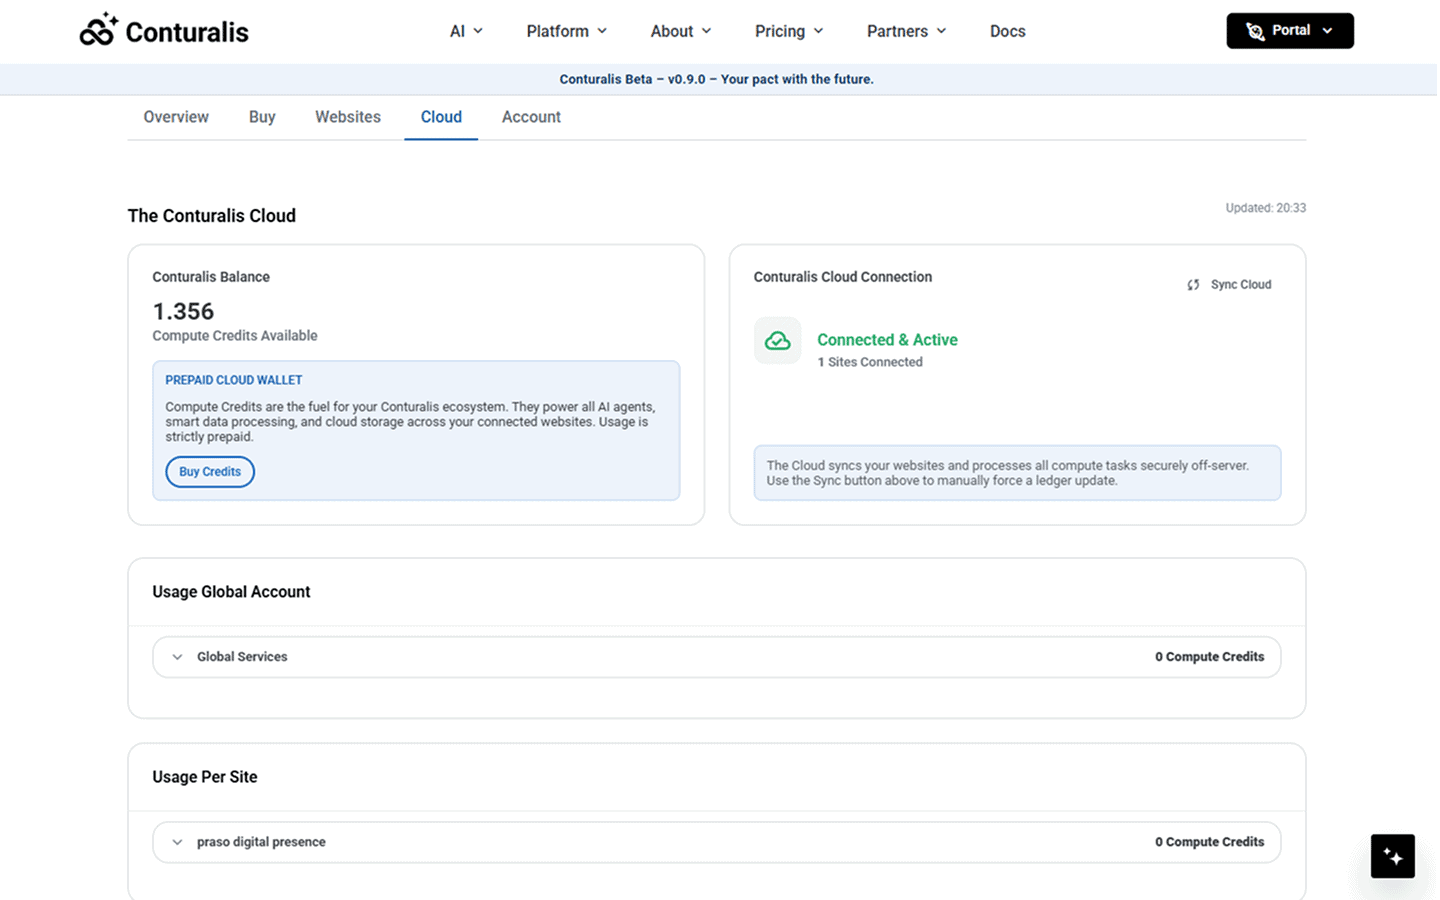
3. Top Up Your Compute Credits
Go to the Buy tab in the Portal to ensure your account has sufficient Compute Credits. Use the volume slider to select your required allocation and complete the transaction.

4. Add Your Website Slot
Head to the Websites tab. Enter your website name in the input field, toggle the specific Web Agent Permissions (Content Agent, Sales Agent, Chat Agent) you want enabled for this site, and click Add Website.
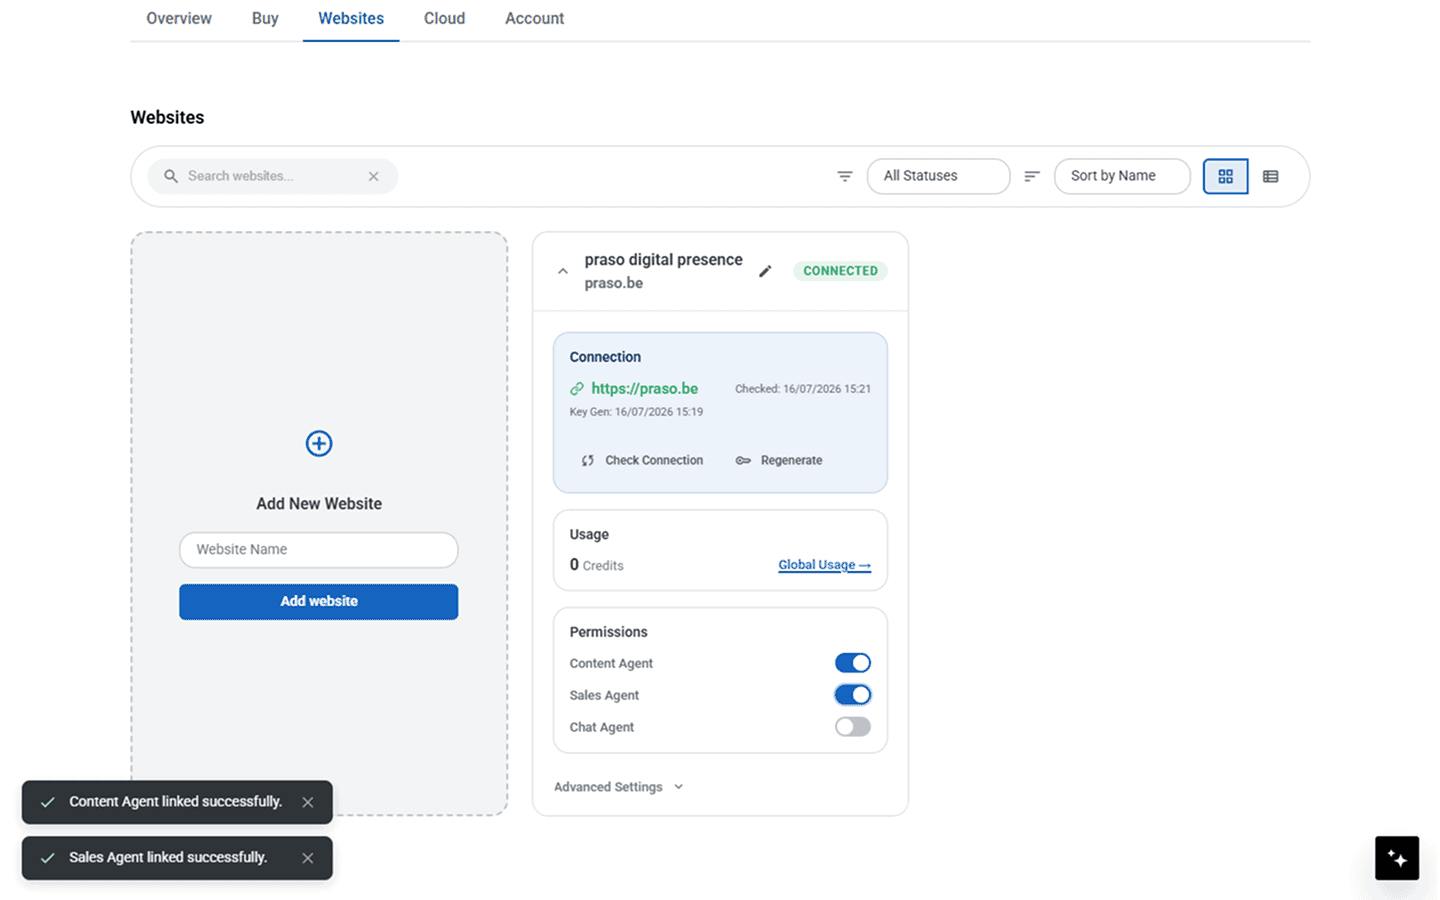
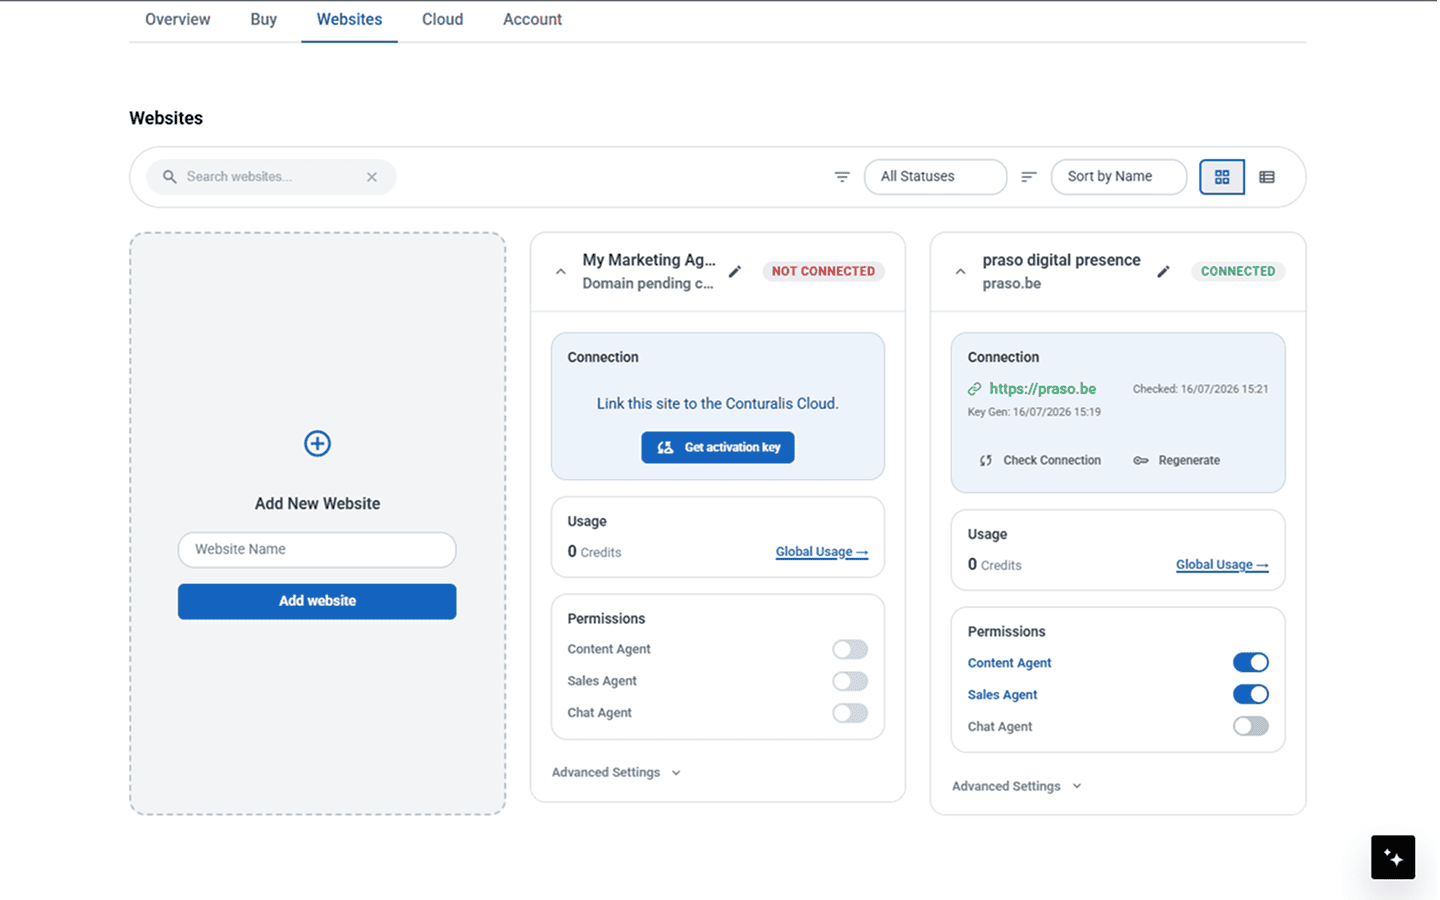
5. Request Your Activation Key
On the newly created website card, click the Get activation key button to initiate authentication token generation.
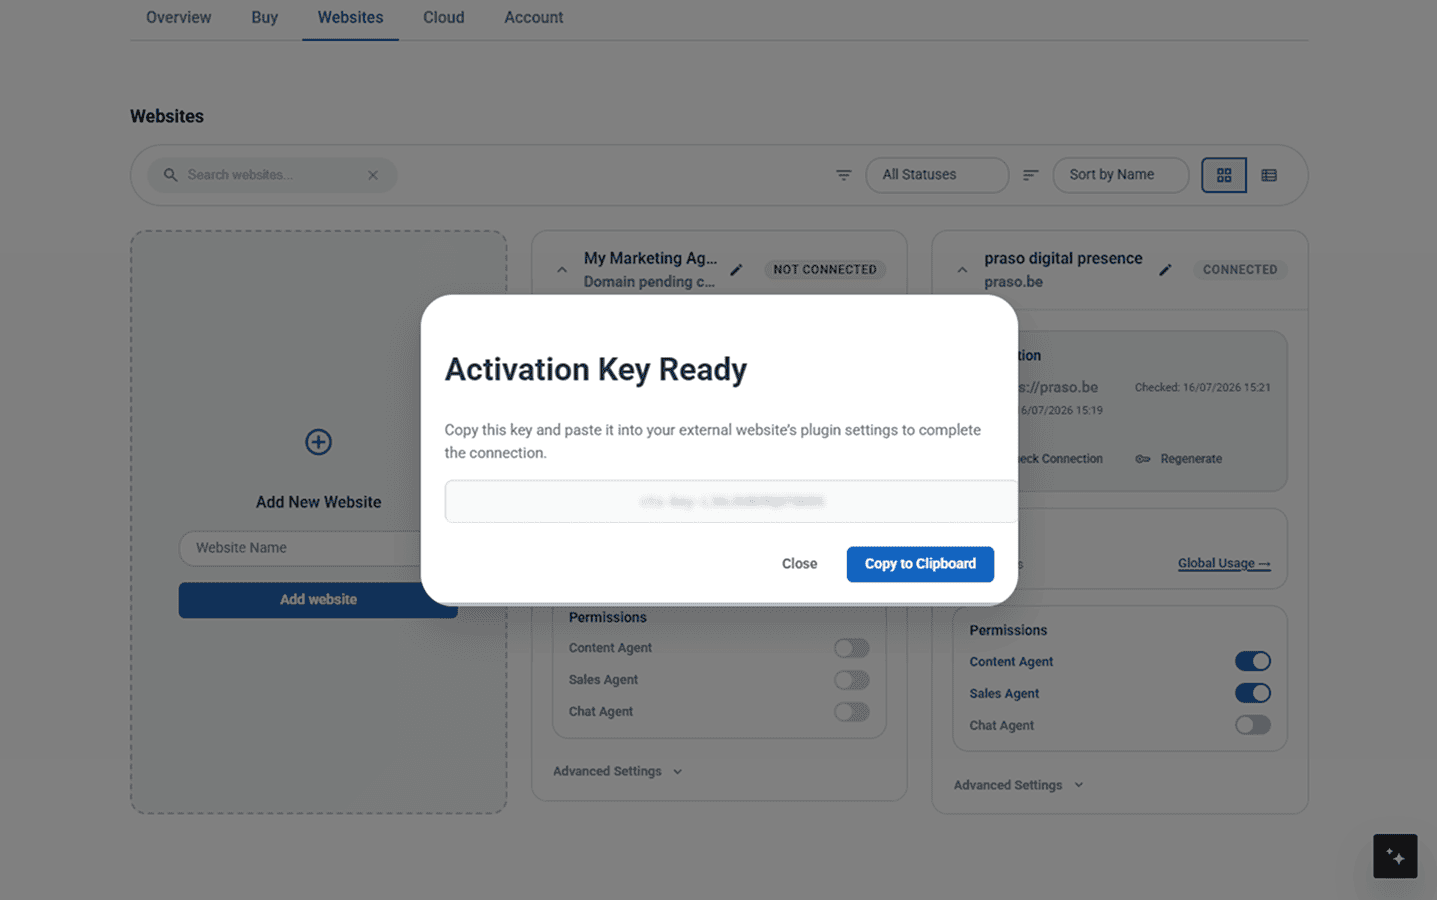
6. Copy Your Activation Key
A popup modal will reveal your newly generated Activation Key. Click Copy to Clipboard and save it securely.
This single-use activation key is displayed only once. Make sure to copy it immediately, as you will not be able to view it again after closing the modal!
7. Install the Plugin in WordPress Admin
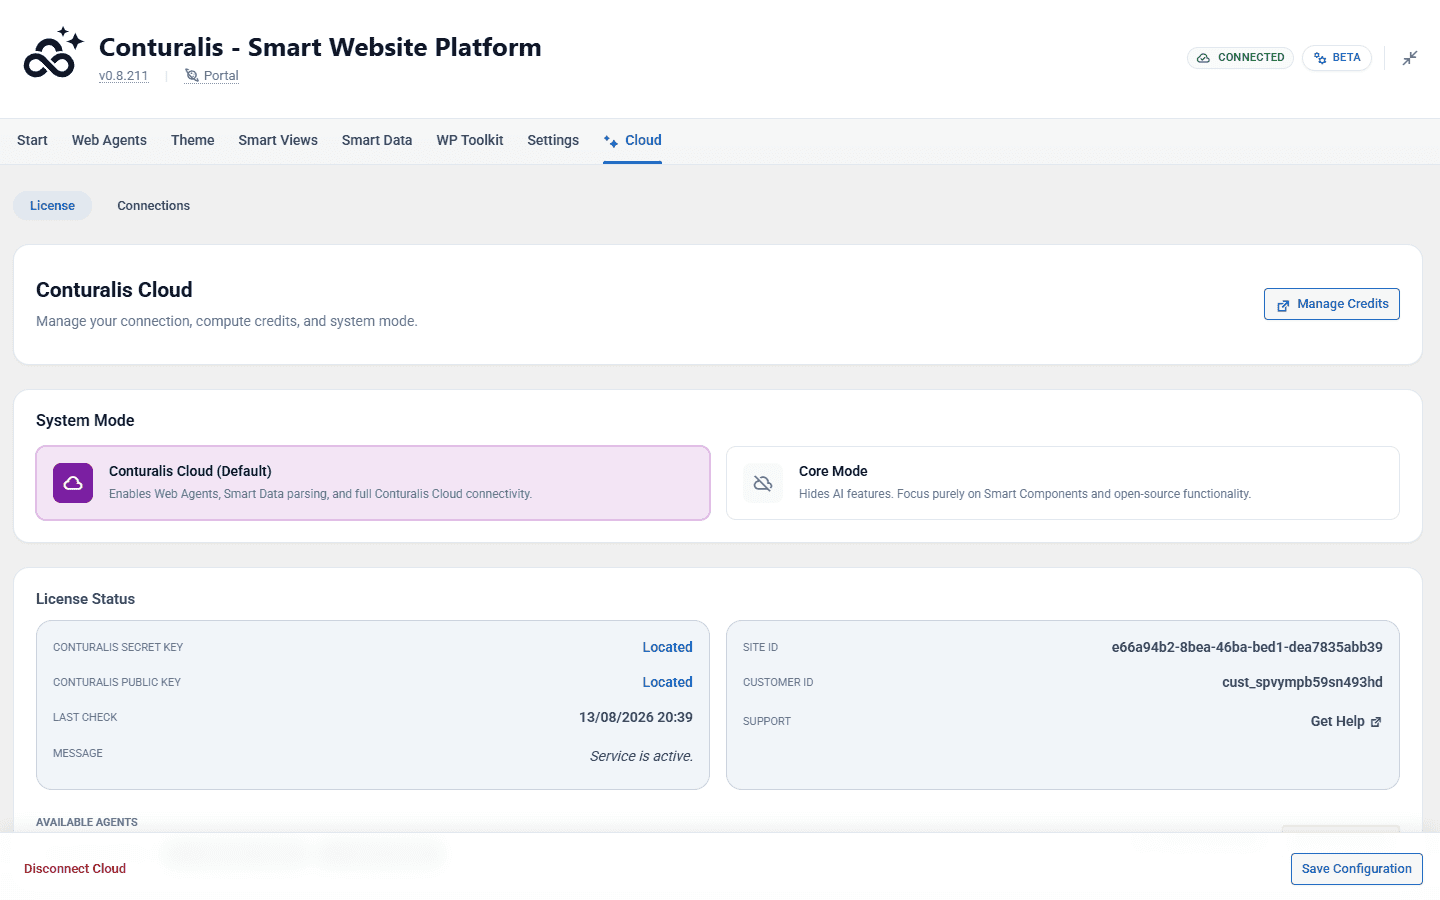
Open your WordPress admin dashboard. Navigate to Plugins > Add New > Upload Plugin, select the Conturalis ZIP file you downloaded in Step 1, install, and activate it. Once activated, navigate to Conturalis > Cloud > License in your sidebar menu.
8. Authenticate & Paste Your Key
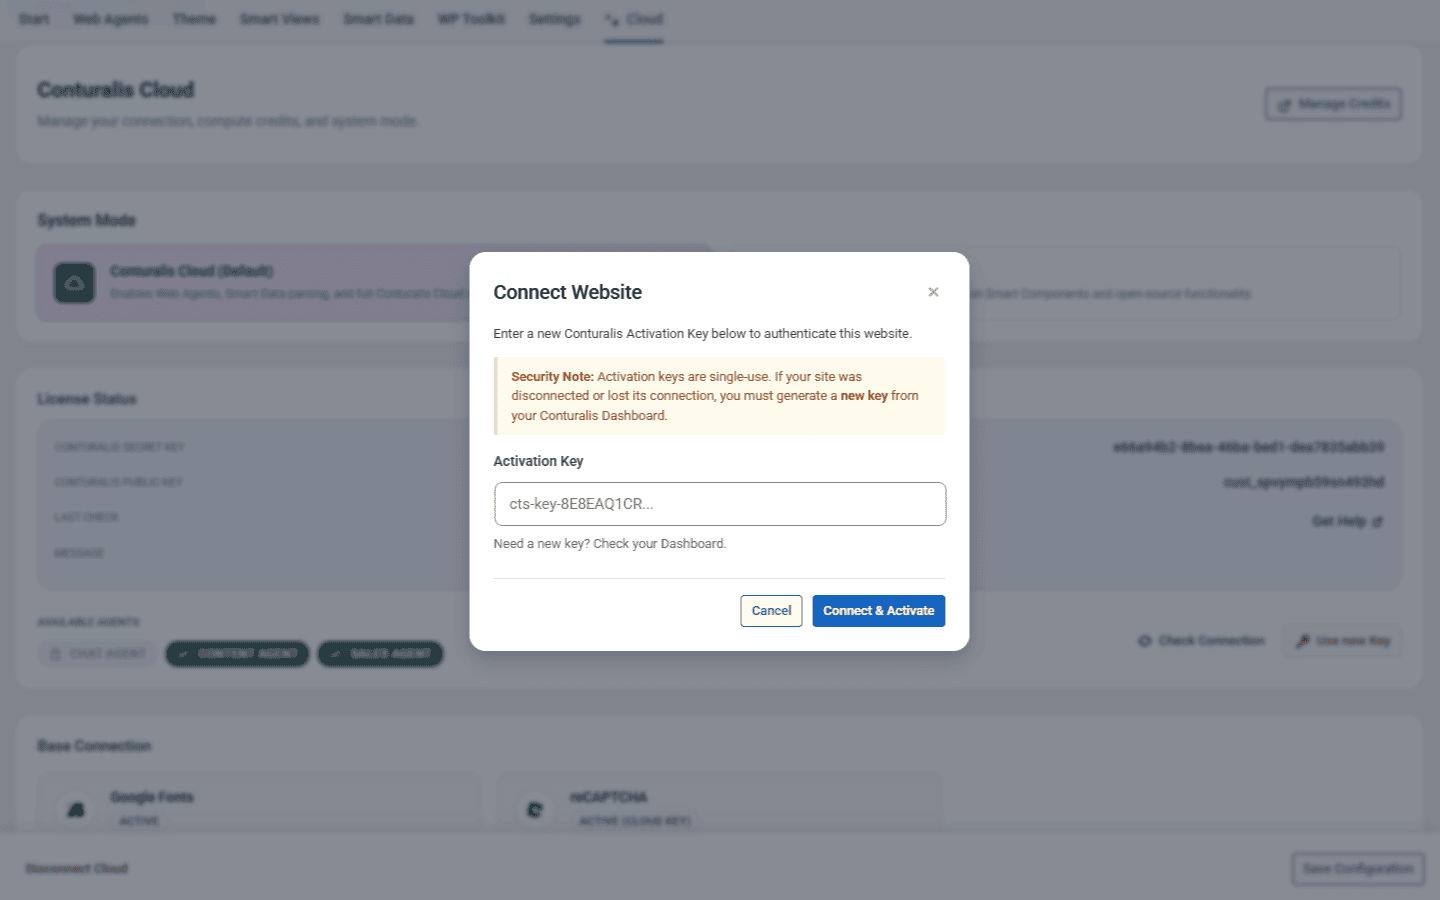
Click the Use new Key / connection button in your WordPress dashboard to open the authentication modal. Paste your copied cts-key-... activation key into the field and click Connect & Activate.
9. Verify Connection & Domain Coupling
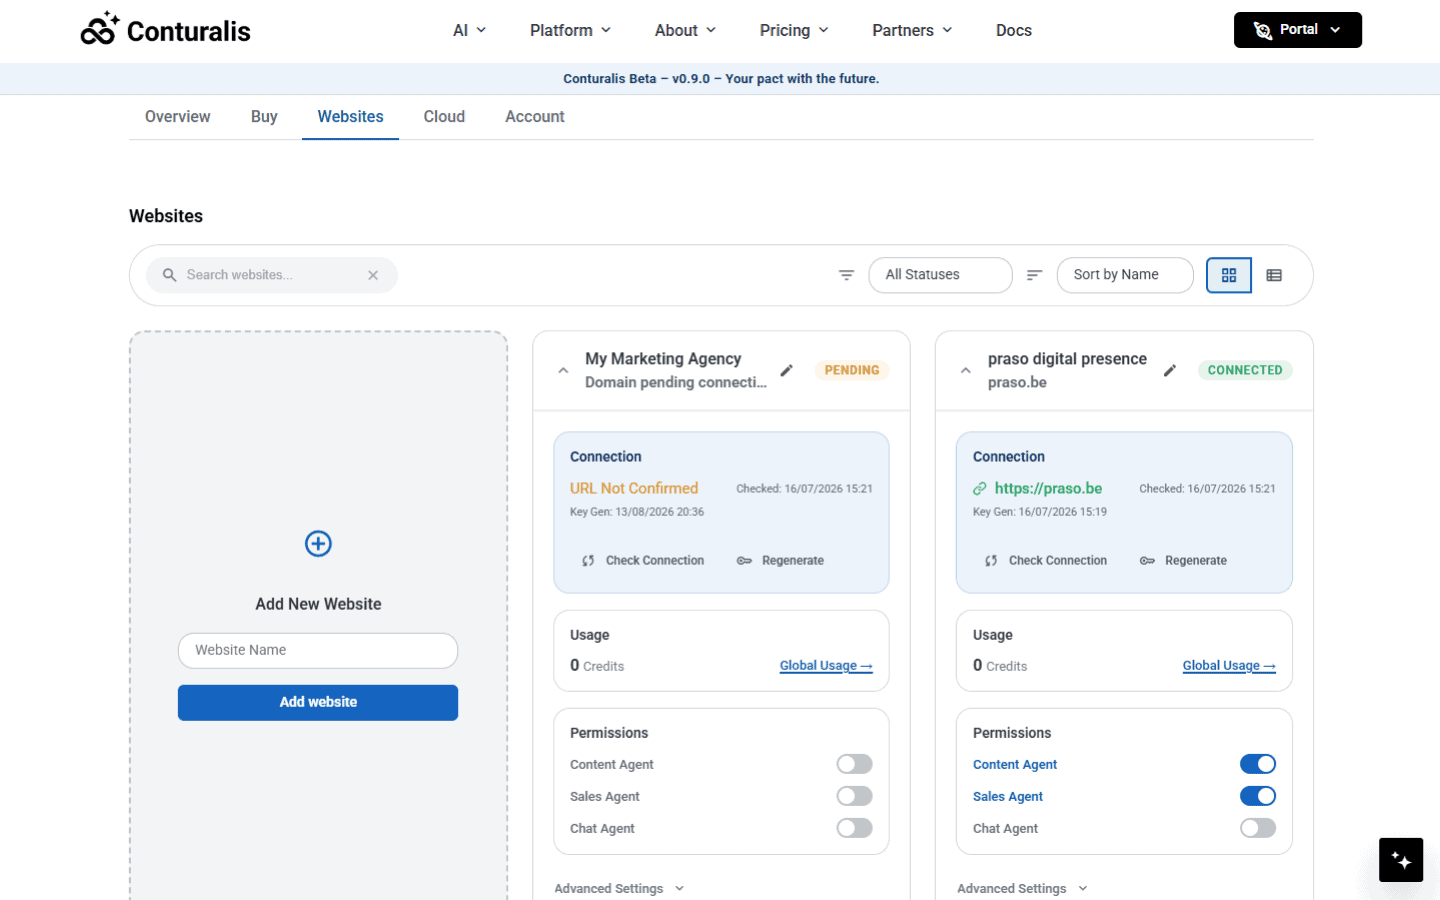
Return to your Conturalis Portal dashboard. The website card will display a PENDING status until the platform completes its automatic domain verification check. You can speed up this process by clicking Check Connection. Once verified, the badge switches to CONNECTED, officially coupling your domain to your cloud web space.
WP Plugin: Operations Guide
Welcome to your AI command center. Once the Conturalis plugin is installed and authorized, a new Conturalis menu appears in your WordPress sidebar. This guide walks you through the physical layout of the dashboard and how to operate your AI ecosystem.
1. The Conpacts Framework
The core of your operations lies in the Conpacts Framework, comprising the Hub, Theme settings, and Smart Views.
Start (The Hub)
This clean command center acts as your operational overview. It gives you a unified, intuitive portal to oversee your entire AI ecosystem and digital presence.
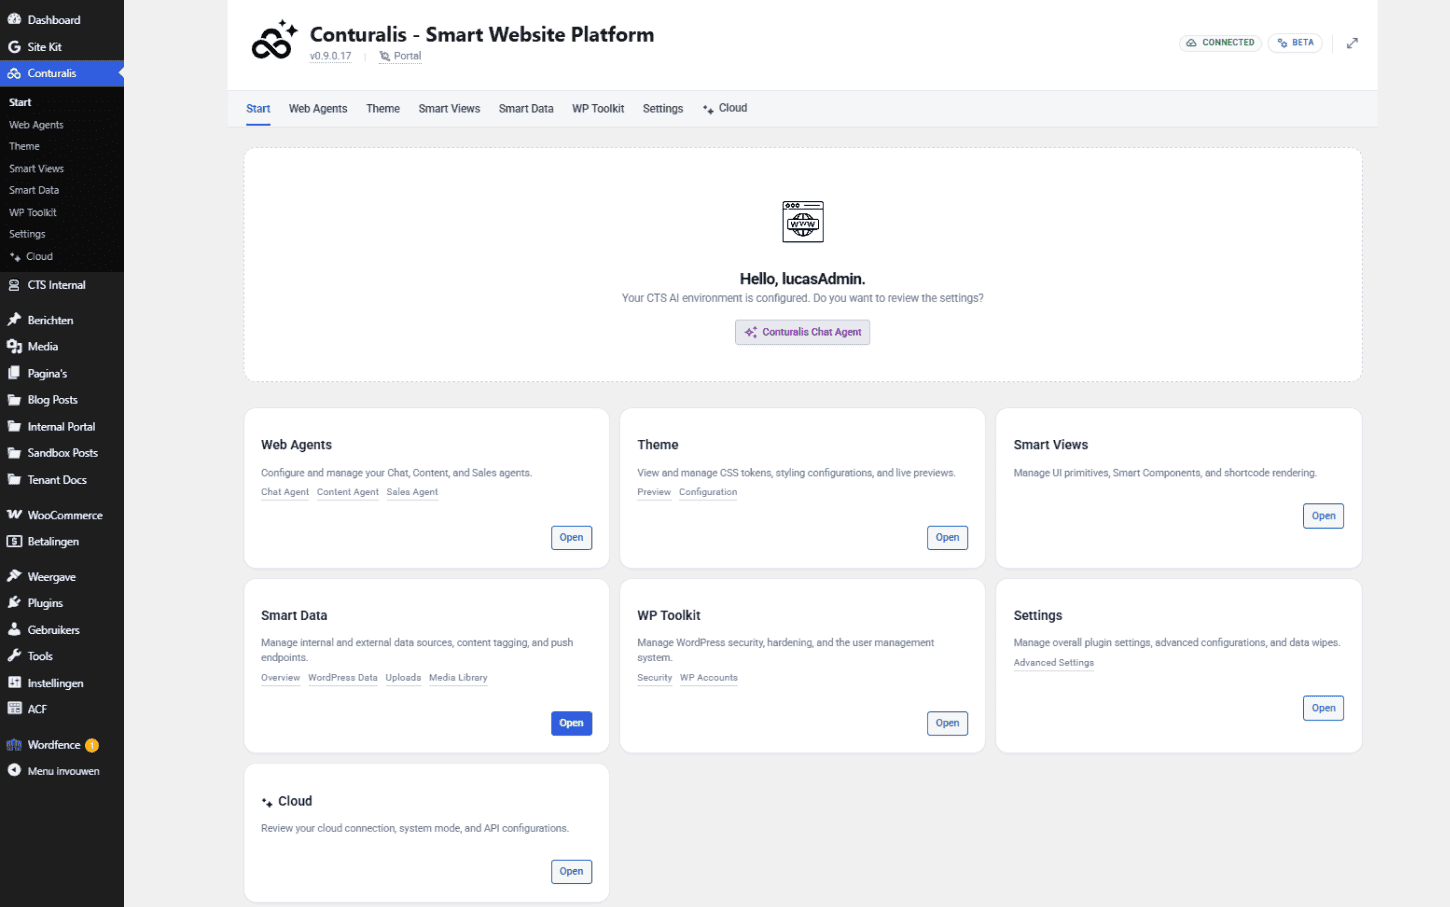
To navigate here, click Conturalis in the left WordPress sidebar to land on the Start tab of the internal top pill-menu. Click the blue Open buttons on the bottom right of the Web Agents, Theme, or Smart Data cards to jump directly into those modules.
Theme & Settings
Easily manage CSS tokens, typography scales, styling configurations, and live previews across your entire site from one central hub.
- Configuration & Preview: Define your brand’s Primary, Secondary, and Accent colors, as well as your typography scales, and view live visualizers of how they look across the site.
- Theme Canvas Installation (Conturalis Shell): Under the
Installsub-tab, you can extract and activate the bundled Conturalis Shell. This hybrid Full Site Editing (FSE) block theme acts as a blank canvas, perfectly blending native WordPress blocks with the Conturalis Design System (colors, fonts, and layout variables) for a frictionless editing experience and guaranteed pixel-perfect style inheritance.
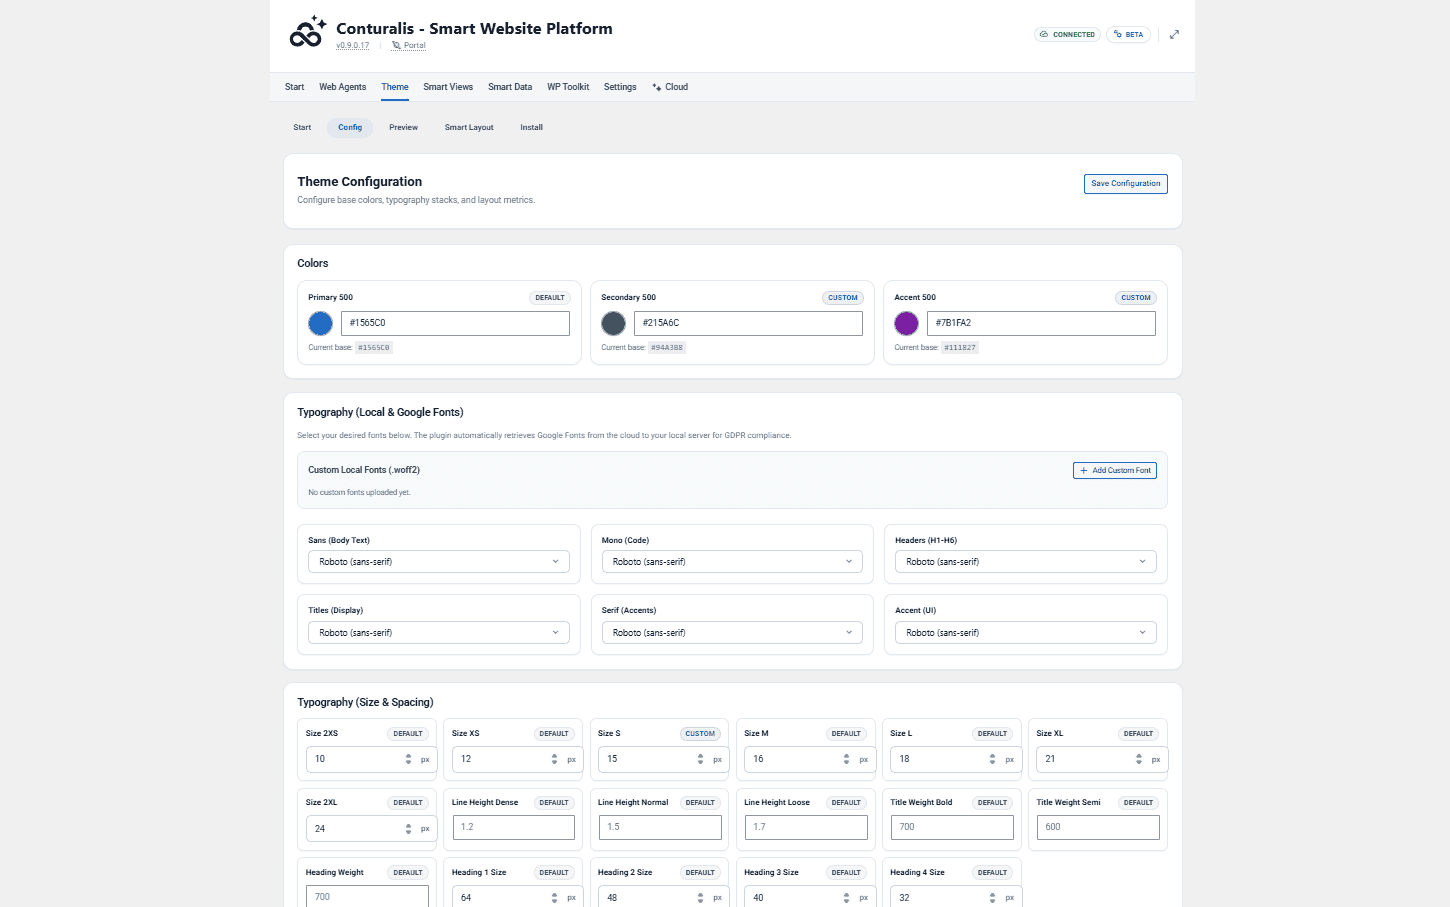
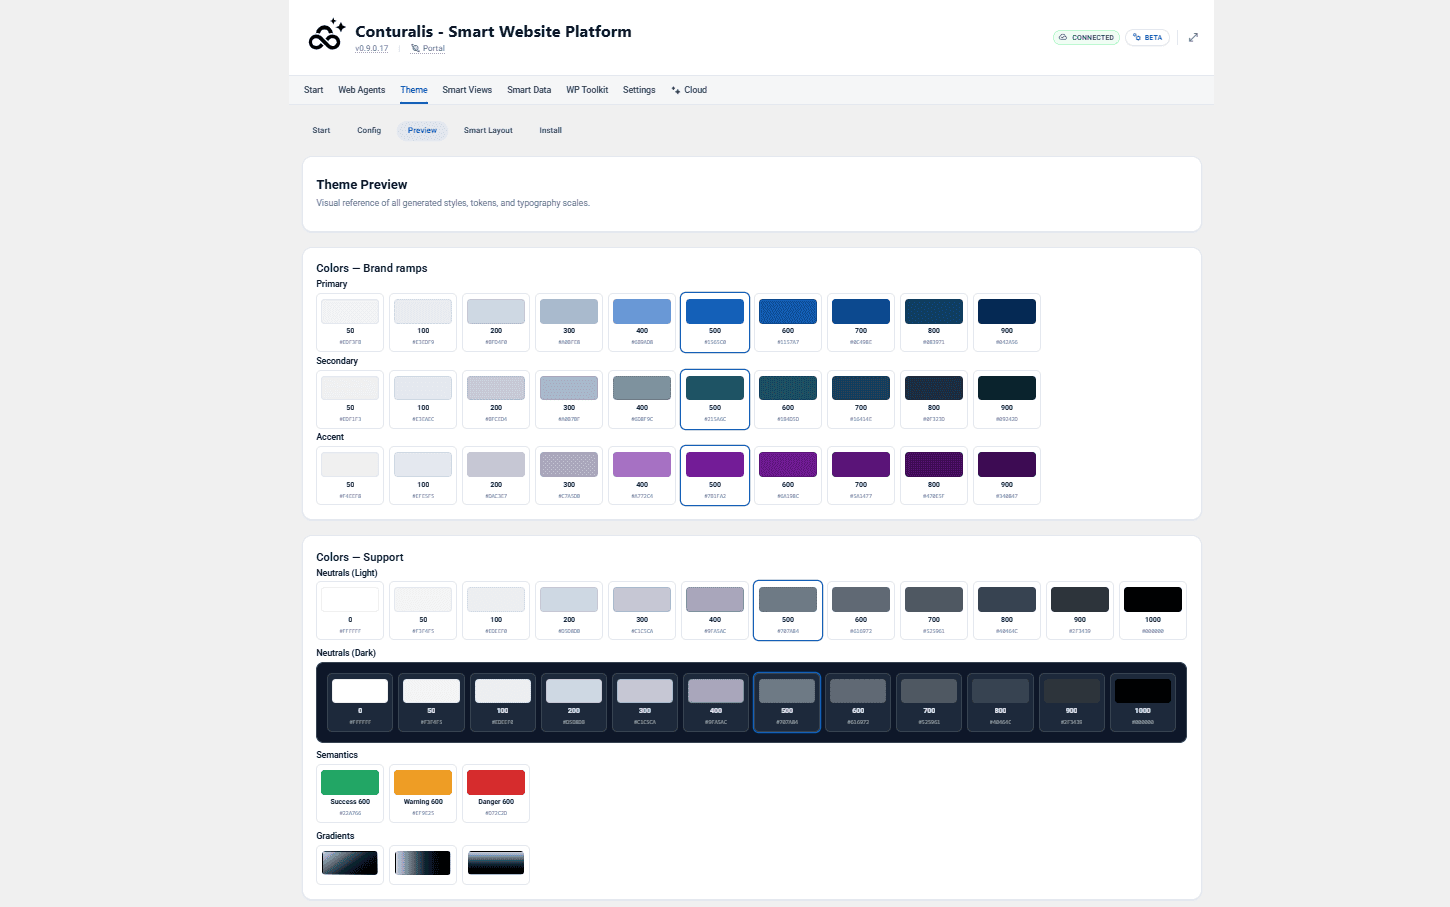

Navigate via the Config, Preview, and Install sub-tabs for theming. Connect or disconnect your site from the Conturalis Cloud using your Activation Key under Cloud > License.
Smart Views
Discover the power of our dual-preset system. Manage UI primitives and Smart Components by creating Content Presets (to sync data globally) and Style Presets (to lock in strict design systems), allowing for autonomous page building.

2. Web Agents (Your AI Workforce)
The Web Agents tab is where you deploy and manage your automated assistants.

- Sales Agent: Your autonomous B2B prospect generator and outreach strategist.
- Content Agent: Your autonomous writer and page builder.
- Chat Agent: Your customer-facing website assistant.
3. Smart Data (Training Your AI)
The Smart Data tab is where you build your private knowledge base so the AI knows your business facts. You can map WordPress content, upload files, and crawl external URLs.
4. Smart Tags
Manage the visual building blocks your AI uses to design pages, enforce strict brand styling, and tag data for context.
Conpacts File Structure
Any Single-File Component placed inside components/custom/ or components/registered/ is instantly auto-detected and registered by the Conpacts Registry Engine without requiring manual registration hooks.
1. The Core Component Folders
All active components on your site reside within the protected components/ directory. The engine splits active components into two auto-registered folders:
conpacts/
├── bootstrap.php                        # Protected: Custom initialization
├── conpacts.php                         # Core loader
├── manifesto.md                         # Architecture guidelines
├── components/
│   ├── custom/                          # [AUTO-REGISTERED] 100% bespoke custom components
│   │   ├── assets/                      # Isolated custom scripts & styles
│   │   │   ├── scripts.js
│   │   │   └── styles.css
│   │   └── my-custom-widget.php
│   │
│   └── registered/                      # [AUTO-REGISTERED] Active library bundle components
│       ├── about-stats-arcturus.php
│       └── feature-bento-betelgeuse.php
│
└── extensions/
    ├── library/                         # READONLY: Upstream bundle warehouse (Conturalis Cloud)
    │   └── components/
    │       ├── arcturus/
    │       ├── betelgeuse/
    │       └── canopus/
    └── third-party/                     # Protected: External community packages
        └── components/
2. The Two Auto-Registration Directories
conpacts/components/custom/(Auto-Registered Custom Scope):This is the dedicated folder for unique, bespoke components built specifically for your client or project. Any component placed here is automatically scanned, assigned the
customscope, and placed under theconpactsblock category. It also includes an isolatedassets/folder for custom CSS and JS.conpacts/components/registered/(Auto-Registered Library Scope):This is the active directory for curated Conturalis library components. When a component from an upstream bundle is placed in this folder, the engine automatically registers it and assigns the
libraryscope, allowing it to seamlessly receive upstream updates.
3. How to Activate and Connect Library Components
Curated component bundles (such as Arcturus or Betelgeuse) are stored inside extensions/library/components/. To activate a library component and keep it connected to upstream updates:
- Copy to
registered/: Copy the component file fromextensions/library/components/{bundle}/intoconpacts/components/registered/. - Update DocBlock Status: Change the metadata comment from
Status: StoredtoStatus: Registered. - Automatic Upstream Sync: Because the component lives in
registered/and keeps its bundle name (e.g.,cts-accordion-arcturus), it remains connected to receive non-destructive upstream template and logic updates during framework updates.
4. Decoupling with Custom Forks
If you need to make destructive or heavy modifications to a library component and want to disconnect it permanently from upstream updates:
- Move the file into
conpacts/components/custom/instead ofregistered/. - Append the
-custom-forksuffix to the filename and Nowdoc JSON name (e.g.,accordion-arcturus-custom-fork.phpand"name": "cts-accordion-arcturus-custom-fork"). - Set
"scope": "custom"in the JSON header.
Smart Layouts
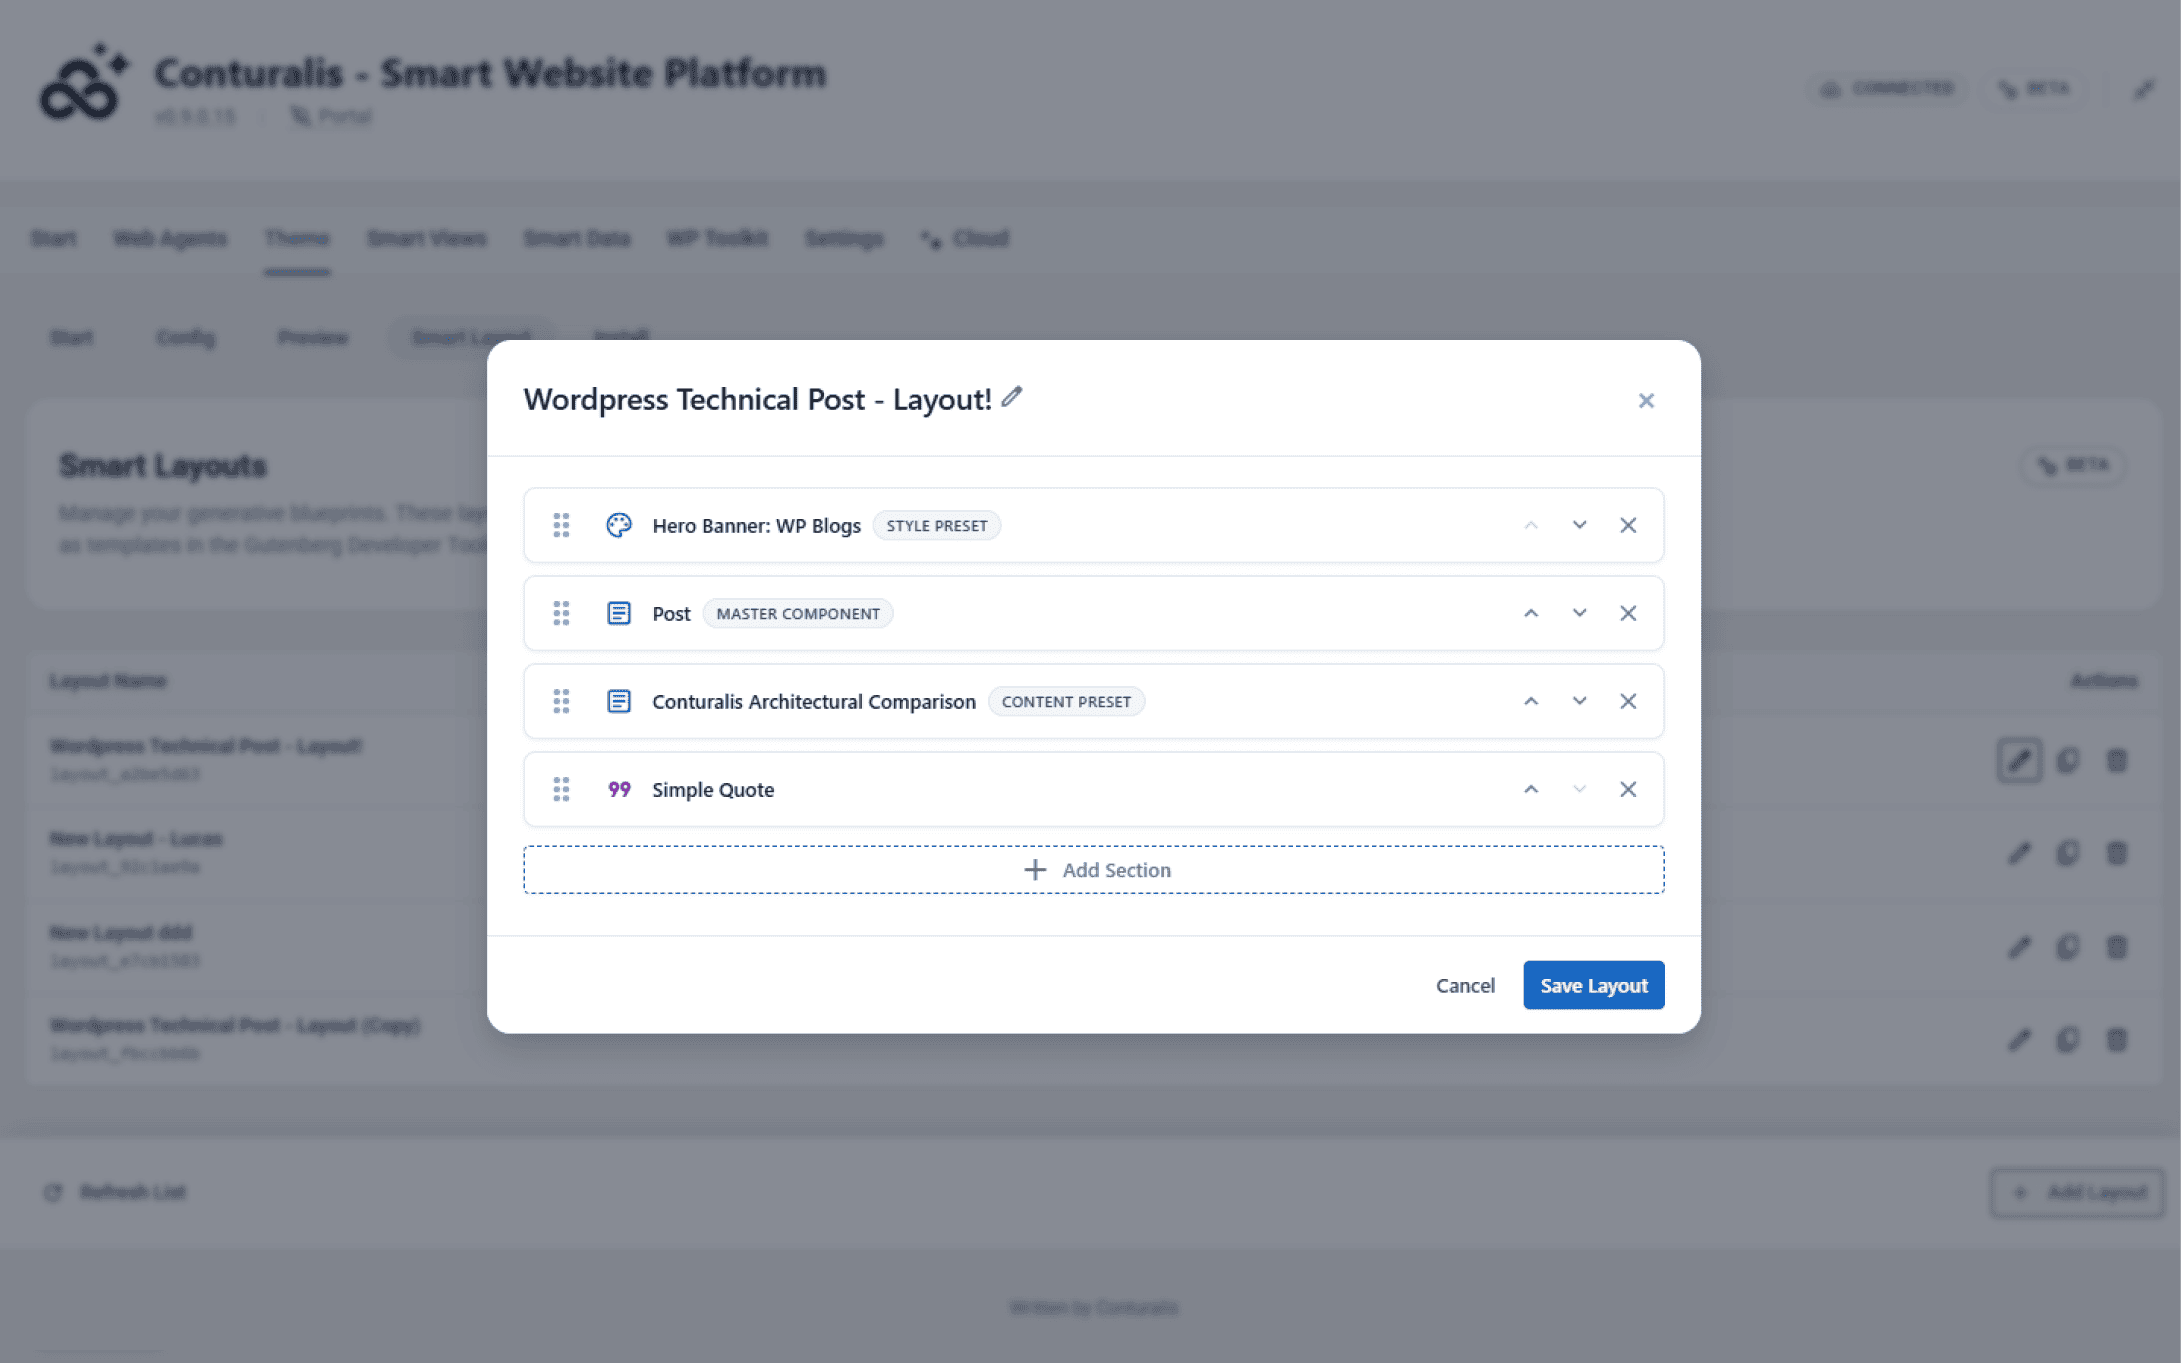
Smart Layouts serve as generative structural blueprints across the Conturalis platform. They define an exact sequential order of Smart Components, presets, and dynamic AI zones to guarantee consistent output across automated campaigns and manual site building.
Smart Layouts eliminate design drift by locking down document hierarchies before content hydration begins, whether executed by human designers in Gutenberg or automatically orchestrated by the Content Agent.
1. Accessing Smart Layouts
To view and create blueprints, navigate to Theme > Smart Layout within the Conturalis WordPress administration panel. Here you will find an overview of all active generative blueprints registered in the environment.
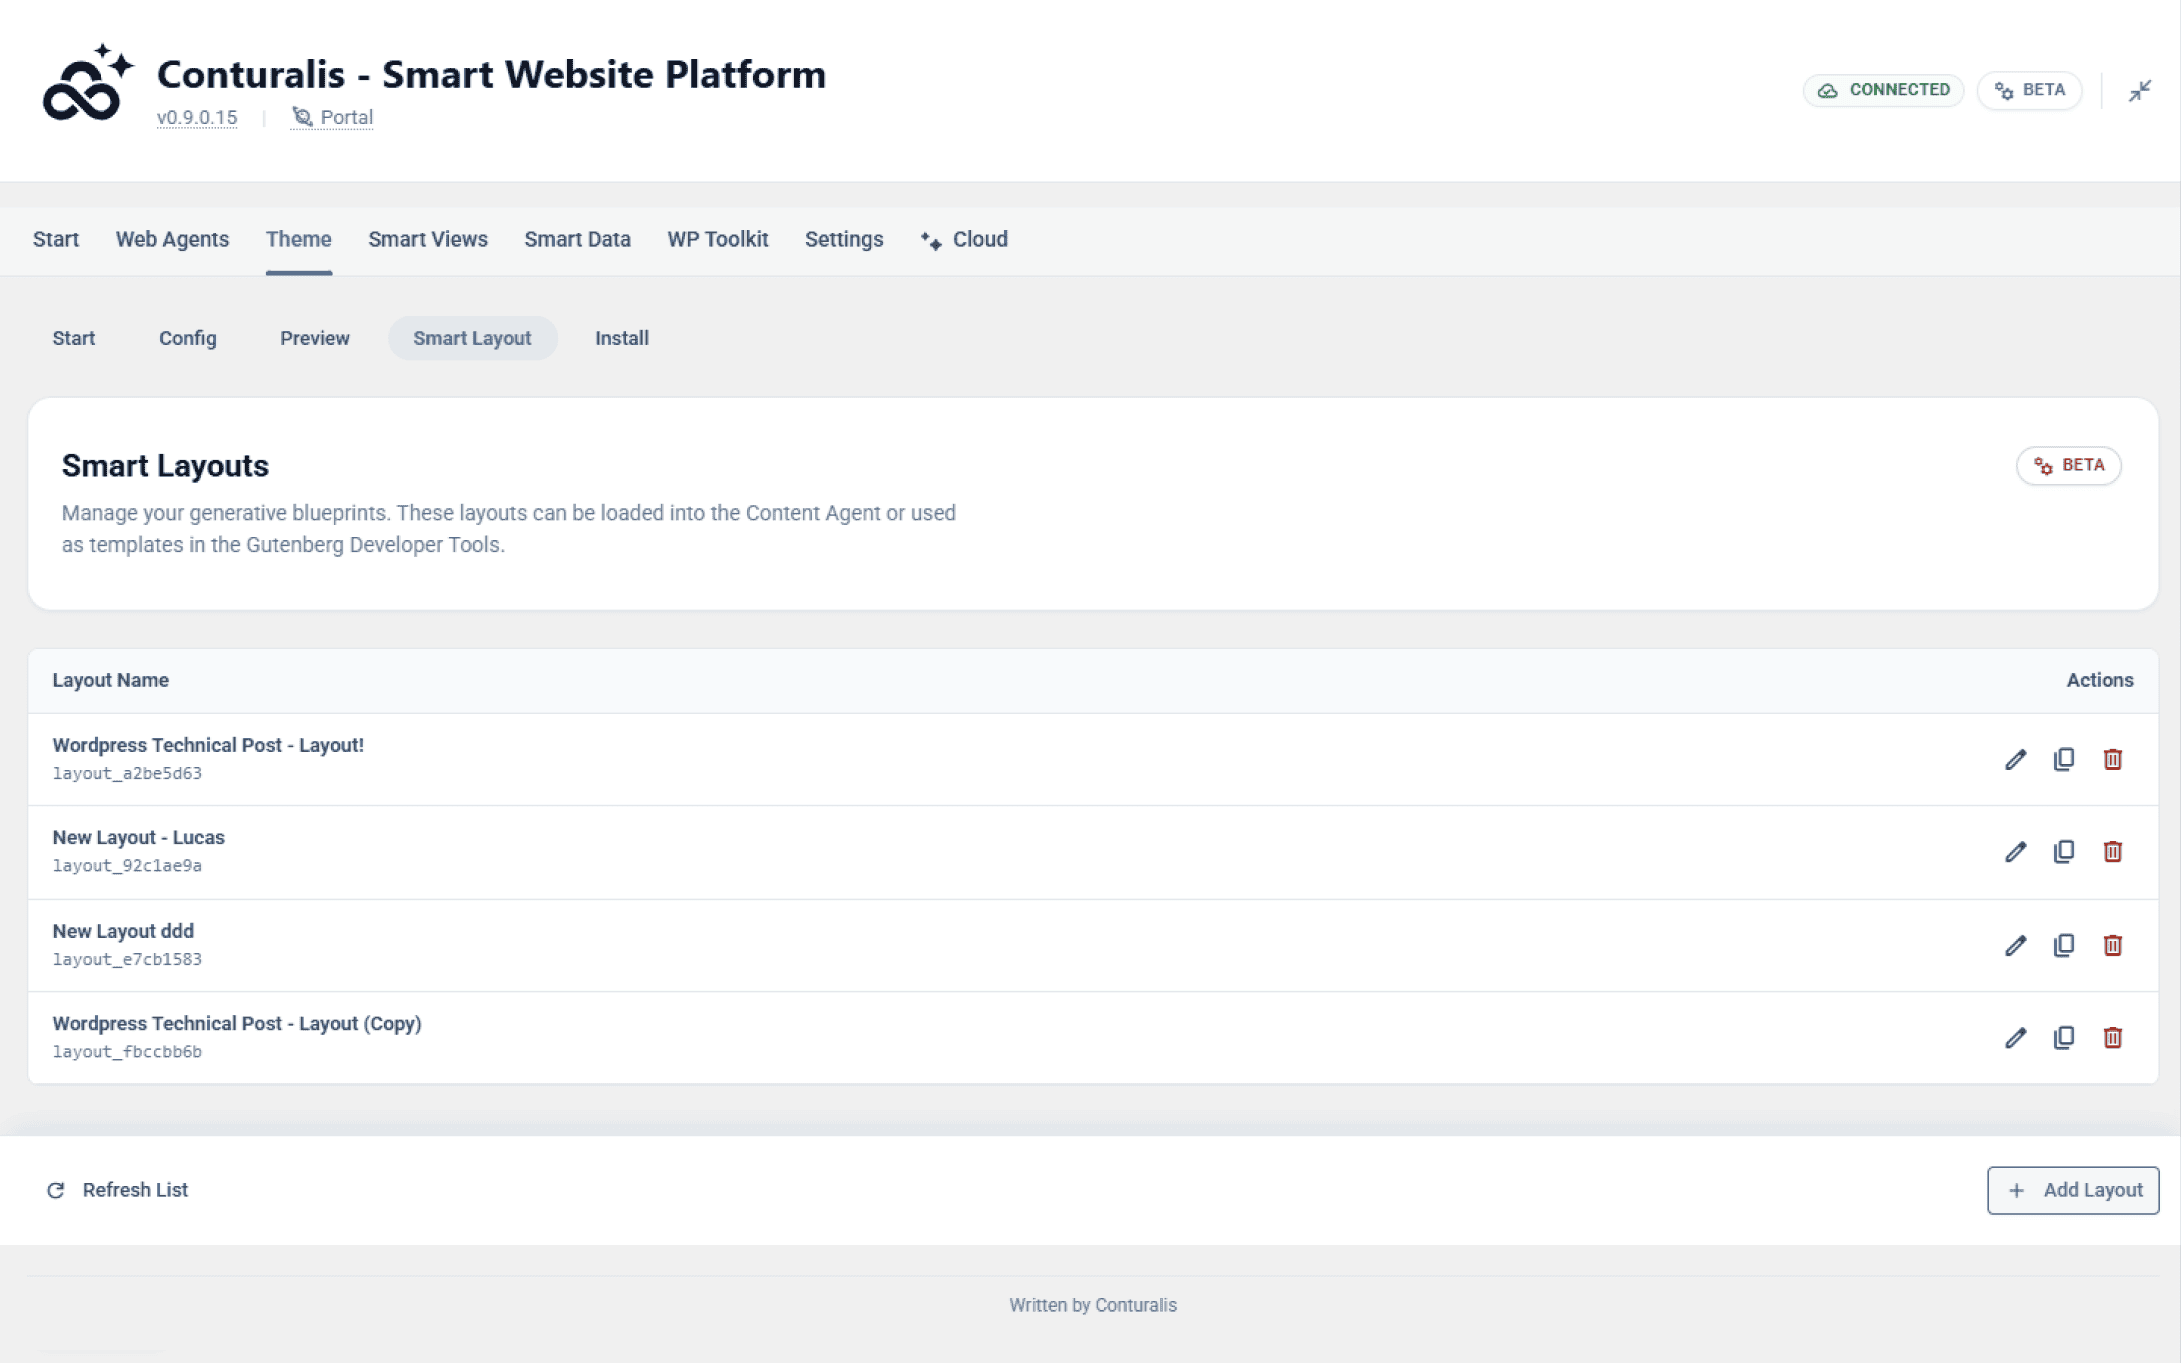
2. Assembling Components and Presets
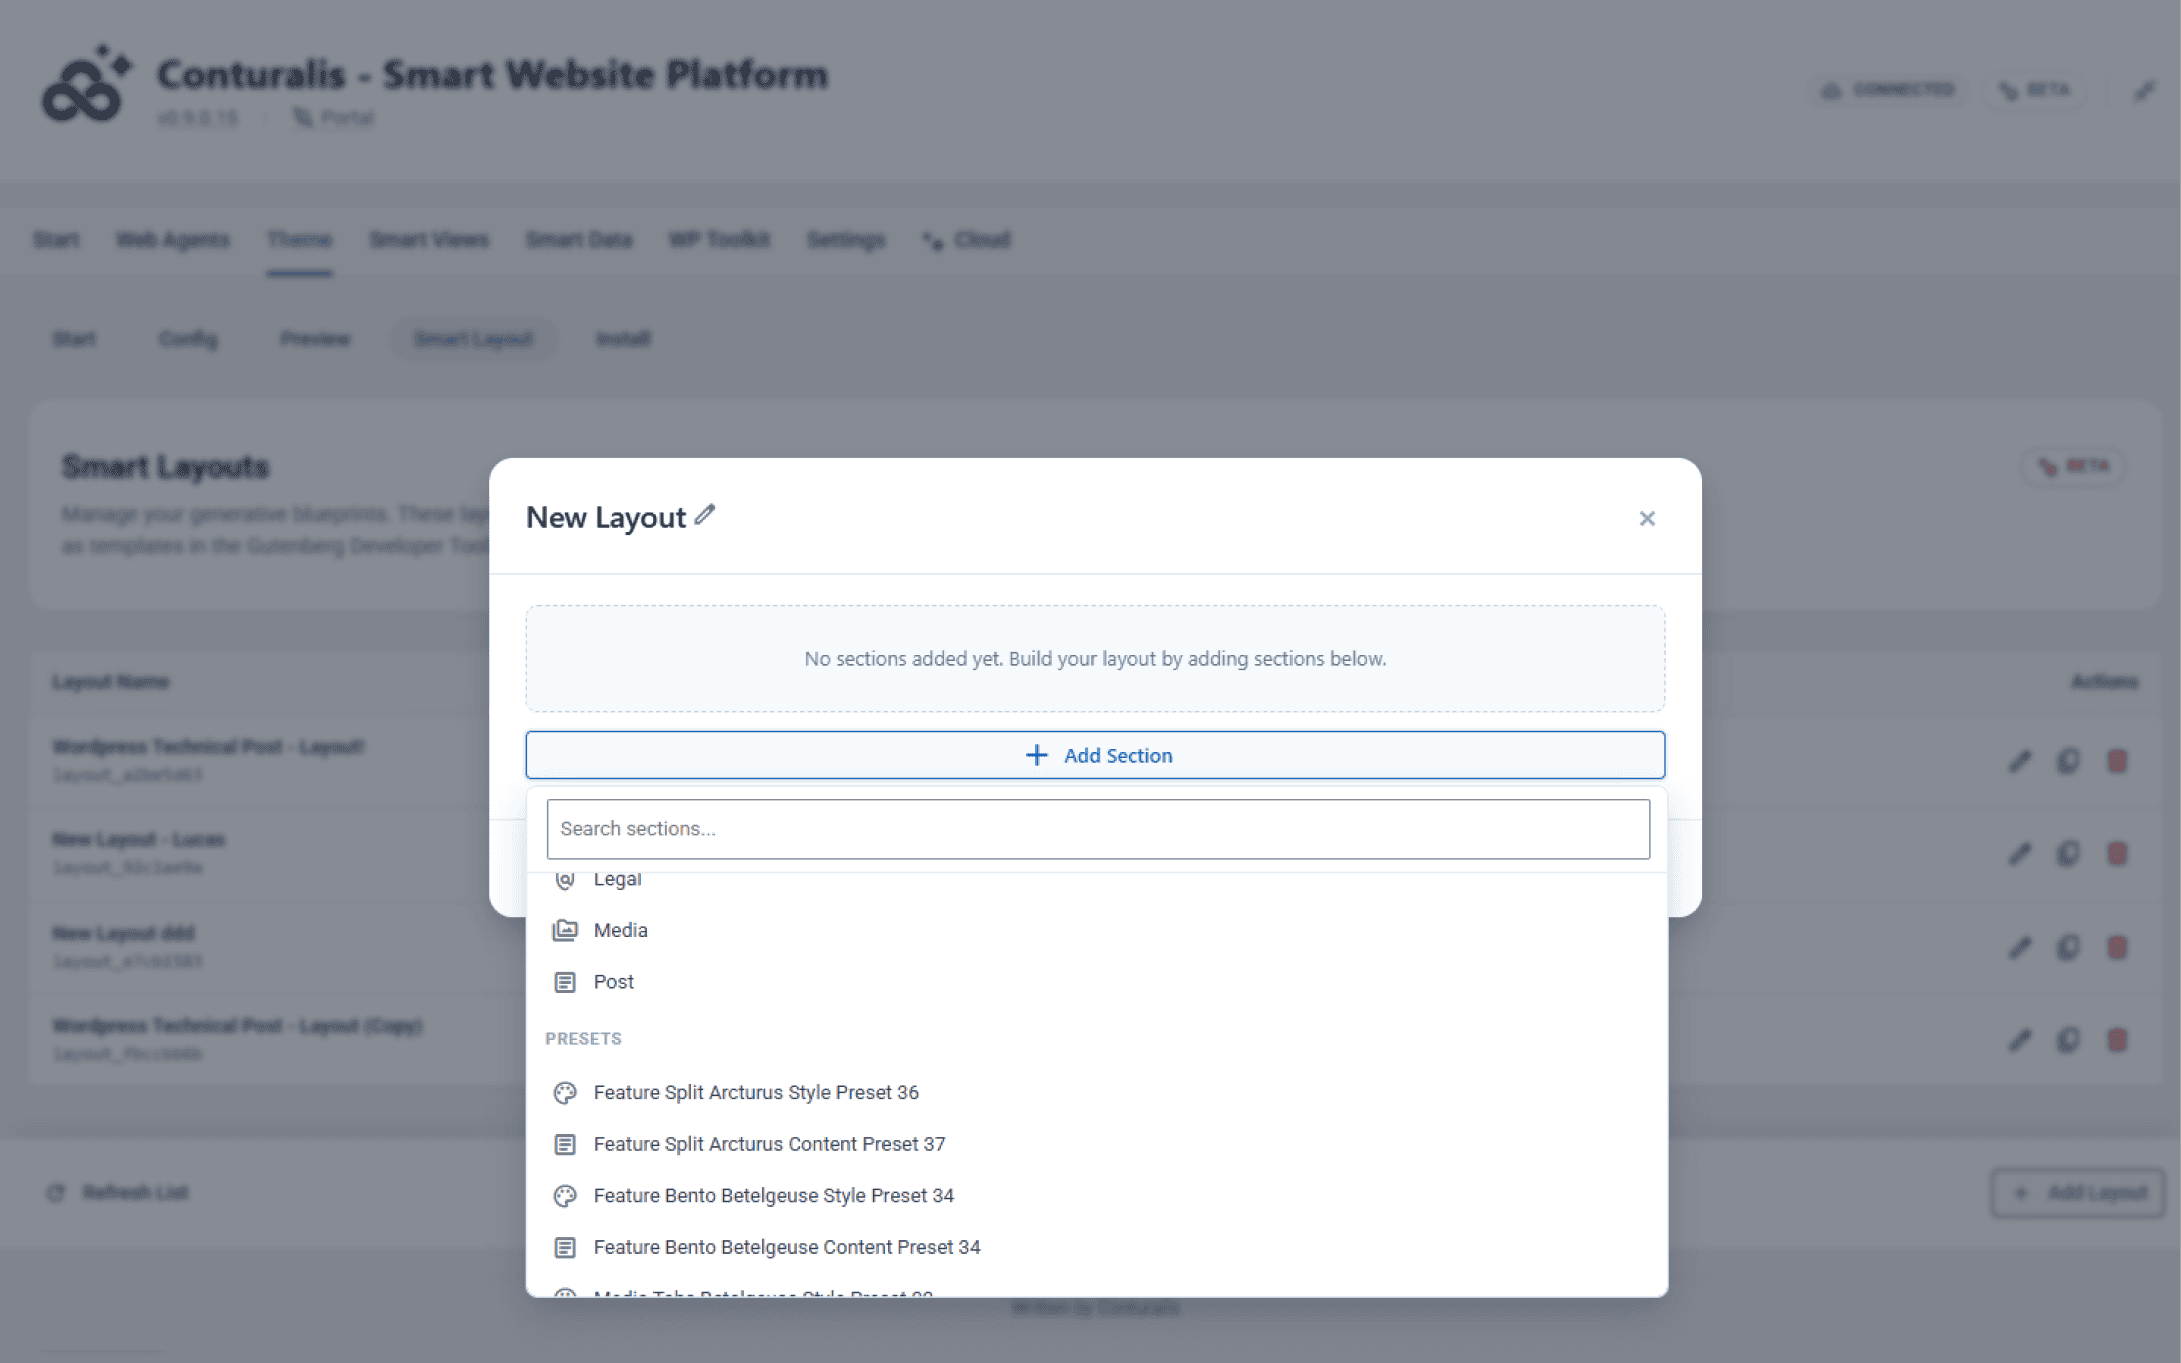
Click + Add Layout to open the blueprint builder modal. When constructing a layout, you have complete flexibility to sequence different layer types:
- Smart Components: Core or Custom framework components inserted in their clean, default state.
- Style Presets: Components locked to specific visual styling tokens, leaving content open for dynamic population.
- Content Presets: Pre-packaged content structures that inherit attached styling rules automatically.
3. Generative Smart Canvas Zones
For autonomous AI workflows, you can insert Smart Canvas zones into your blueprint. By defining a numeric component threshold within the zone box, you grant the AI agent permission to autonomously evaluate topical context and select the most suitable Smart Components to fill that section of the page.
4. Saving and Deploying Blueprints
Once your sequence is configured, click Save Layout. The blueprint is instantly compiled and ready for deployment across two primary environments:
- Gutenberg Native Editor: Insert the
cts-layoutSmart Component and select your saved layout from the Developer Tools panel to replace the editor canvas with your blueprint instantly. - Content Agent Automation: Assign the Smart Layout as the structural master template for scheduled generation pipelines.
Beta Lifecycle
Conturalis is currently in an active Beta cycle. To deliver rapid enhancements to AI agents, layout rendering, and schema performance, the platform operates on a continuous deployment model with frequent, 4-digit version releases.
Version numbers follow a four-digit schema (e.g. v0.9.0.15) that increments rapidly with automated migrations and performance patches. Always ensure staging environments are verified when upgrading between major build iterations.
1. The 4-Digit Versioning System
Because features and autonomous agent capabilities evolve swiftly, version tags reflect exact build revisions. Incremental updates roll out core schema refinements, UI optimizations, and dynamic integration bridges without interrupting running services.
2. UI Status Badges & Lifecycle Chips
To provide transparency on feature maturity and stability, the platform categorizes functionality using three distinct status chips across the administration dashboard:
- Global Platform Beta (Blue Chip): Located in the primary navigation header beside connection status. This indicates that the core Conturalis platform is in active Beta, signaling continuous architecture improvements across all integrated modules.
- Feature-Level Beta (Orange Warning Chip): Displayed in sub-headers for active modules such as Smart Layouts. This signifies that the functionality is operational but under heavy real-world testing. Features are safe for production use, but UI workflows and field schemas may receive frequent updates.
- Demo / In-Development (Orange Warning Badge): Displayed directly within emerging modules (such as Smart Data Research). These tools are accessible for live testing and preview workflows, but are in active architecture development. Data retention is not guaranteed across updates for demo-flagged features, as underlying database structures may be restructured or purged during migration routines.
3. Best Practices During Beta
When operating during the platform beta phase, follow these baseline practices to maintain stability:
- Staging First: Test agent pipelines and Smart Layout blueprints in staging before syncing configuration exports to live environments.
- Preset Syncs: Utilize the automated preset indexing tools in the admin panel to ensure new component properties are registered immediately across the block editor.
- Feedback Loops: Report edge cases or unexpected render states directly through the connected support portal to expedite patch releases.
Intro
The Smart Views tab manages the visual building blocks your AI uses to design pages and interact with users.
1. Smart Components & Presets
View the available visual blocks (e.g., Hero Banners, Pricing Tables). Here, you manage the global synchronization of your UI via our dual-preset system:
- Content Presets: Save the actual data (text, images, links) inside a component. Ideal for reusable information like a global “Partner Call-to-Action” block.
- Style Presets: Save the visual configuration (colors, spacing, layouts) independently of the content. You can attach a Default Style Preset to a Content Preset.
- Component Locks: Lock specific attributes within a preset to maintain absolute brand consistency, preventing human editors and AI Agents from overriding them.
When editing a component inside the native WordPress editor (Gutenberg), look at the right-hand sidebar under AI Preset Settings. Click the Active Mode toggle to switch between CONTENT PRESET and STYLE PRESET.
2. Legacy Shortcodes & Permissions
- Shortcodes: Manage legacy shortcodes for environments that do not support modern blocks.
- Agent Usage Permissions: Explicitly allow or deny your AI agents the ability to utilize your Smart Components and Shortcodes during their operations. Navigate to the Web Agents tab, select a specific agent’s Config sub-tab, and use the provided toggles to grant or revoke access.
Smart Component Presets
Style Presets decouple visual styling from content data. They allow teams to enforce consistent brand guidelines, eliminate design system fragmentation, and provide automated AI generation pipelines with battle-tested visual blueprints.
1. Accessing Smart Views & Component Registry
Navigate to Conturalis > Smart Views > Smart Components to inspect every component registered across your environment. The system scans component files dynamically and compiles them into a unified catalog.
Whenever you add new custom components, install library bundles, or alter property schemas, click the Synced status button in the bottom utility bar to trigger an immediate cache flush and registry rebuild (Conturalis_Registry::sync_now()).
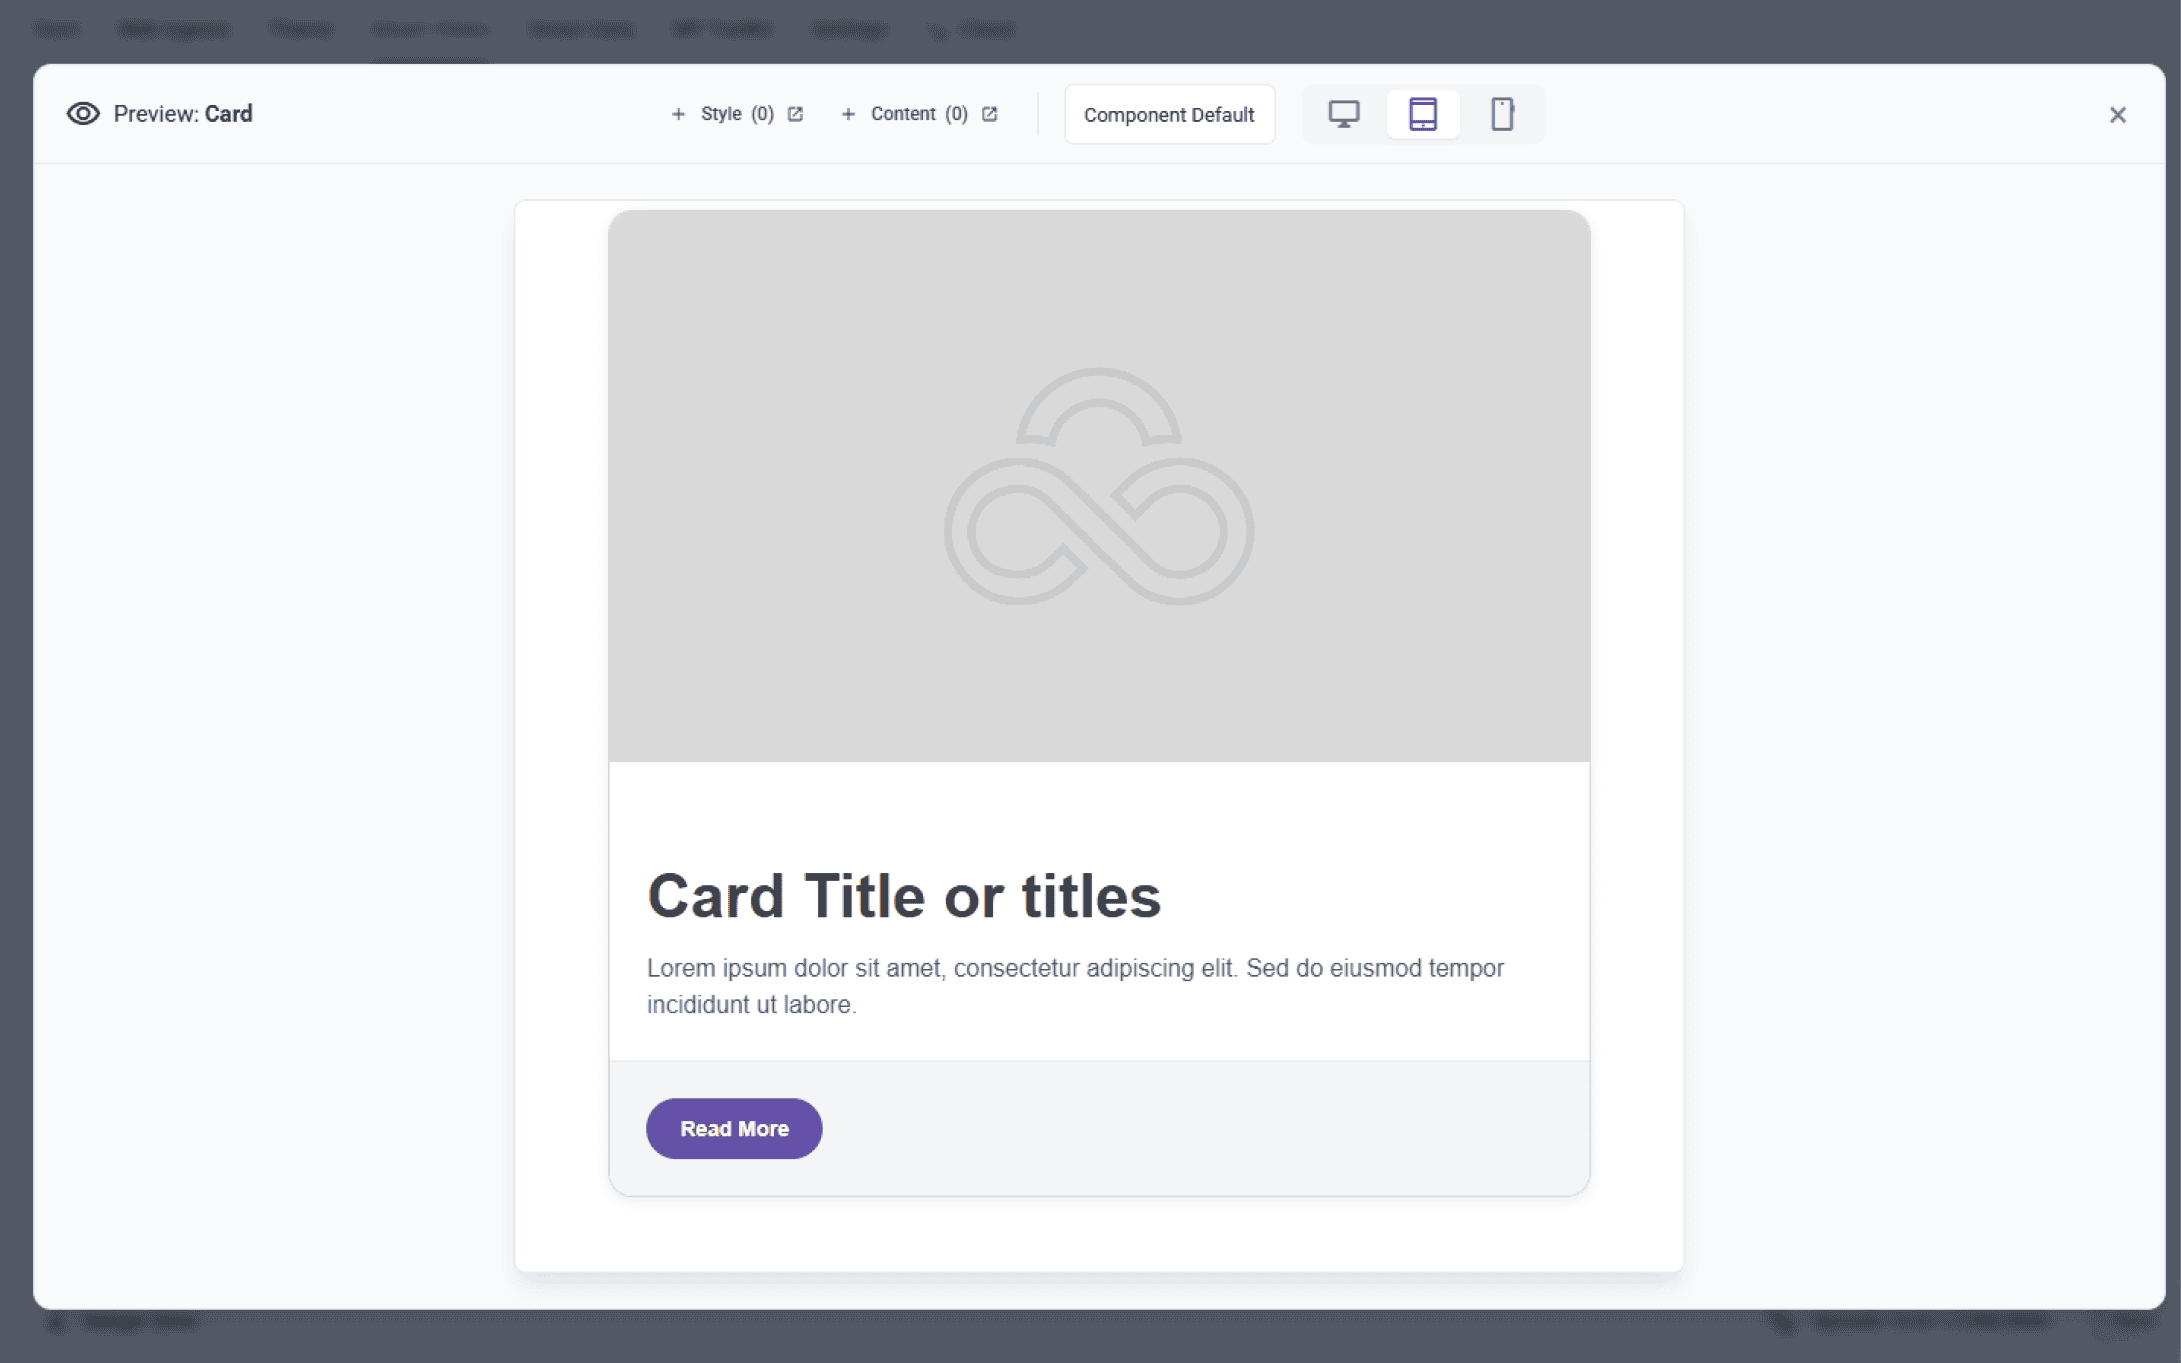
To inspect a component’s default DOM structure, typography scale, and responsive behavior without opening an editor, click the Preview (Eye) icon directly beside any component name.
2. Managing Component Presets
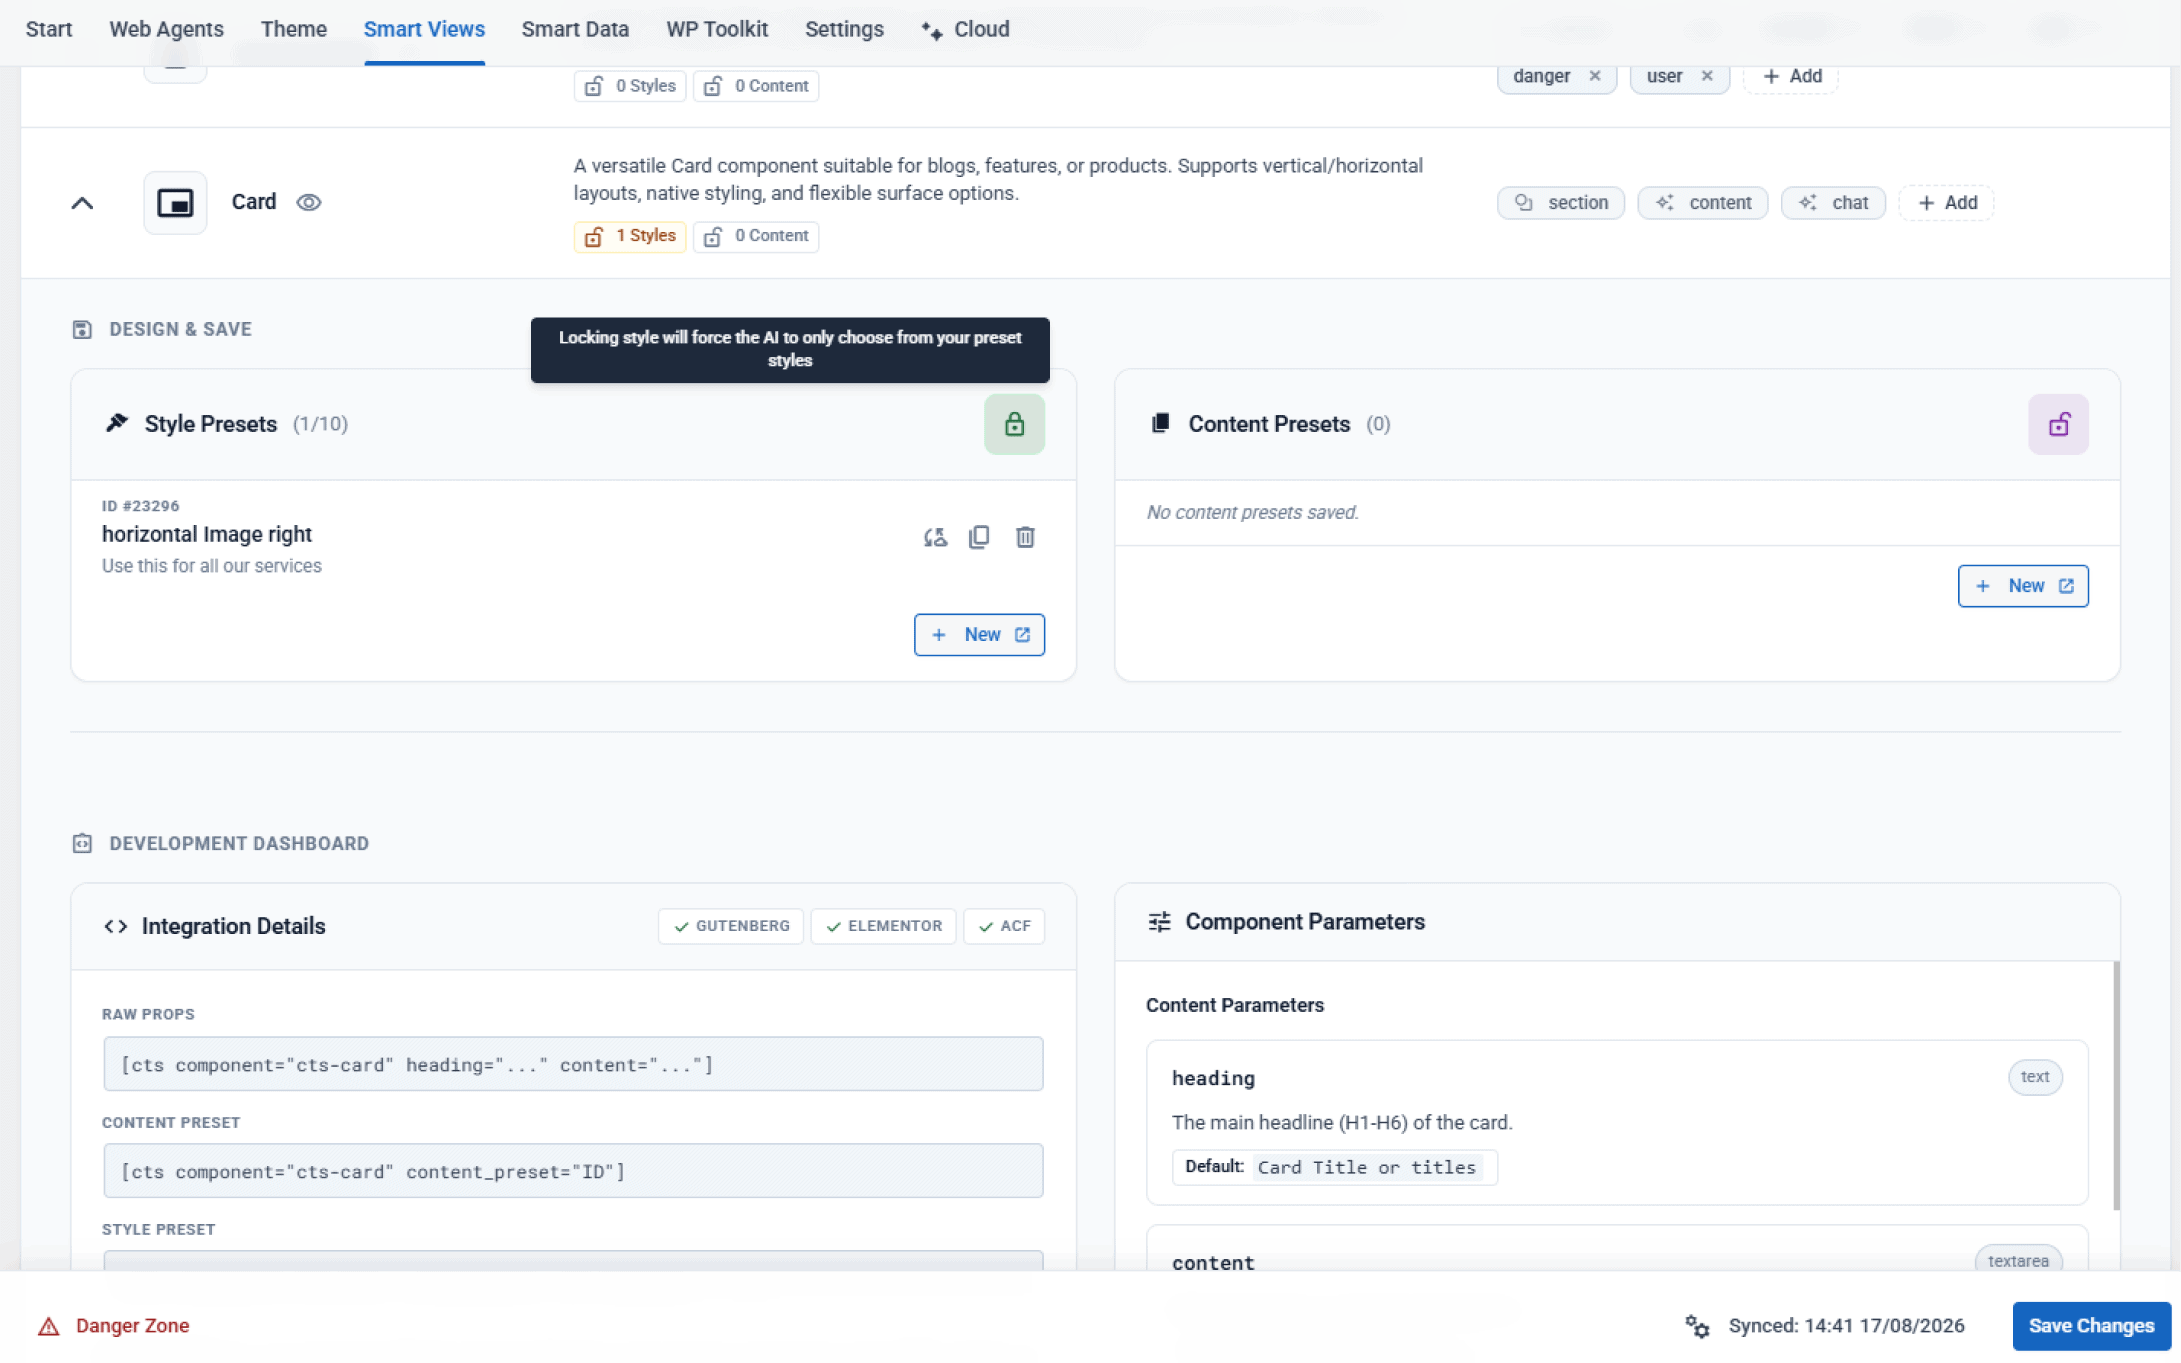
Click any component row to expand its operational drawer. The Design & Save section divides configuration into two distinct layers:
- Style Presets: Store layout structures, container widths, colors, borders, and animations.
- Content Presets: Store static text, default media, button URLs, and attached style mappings.

3. Building Presets with Native Gutenberg
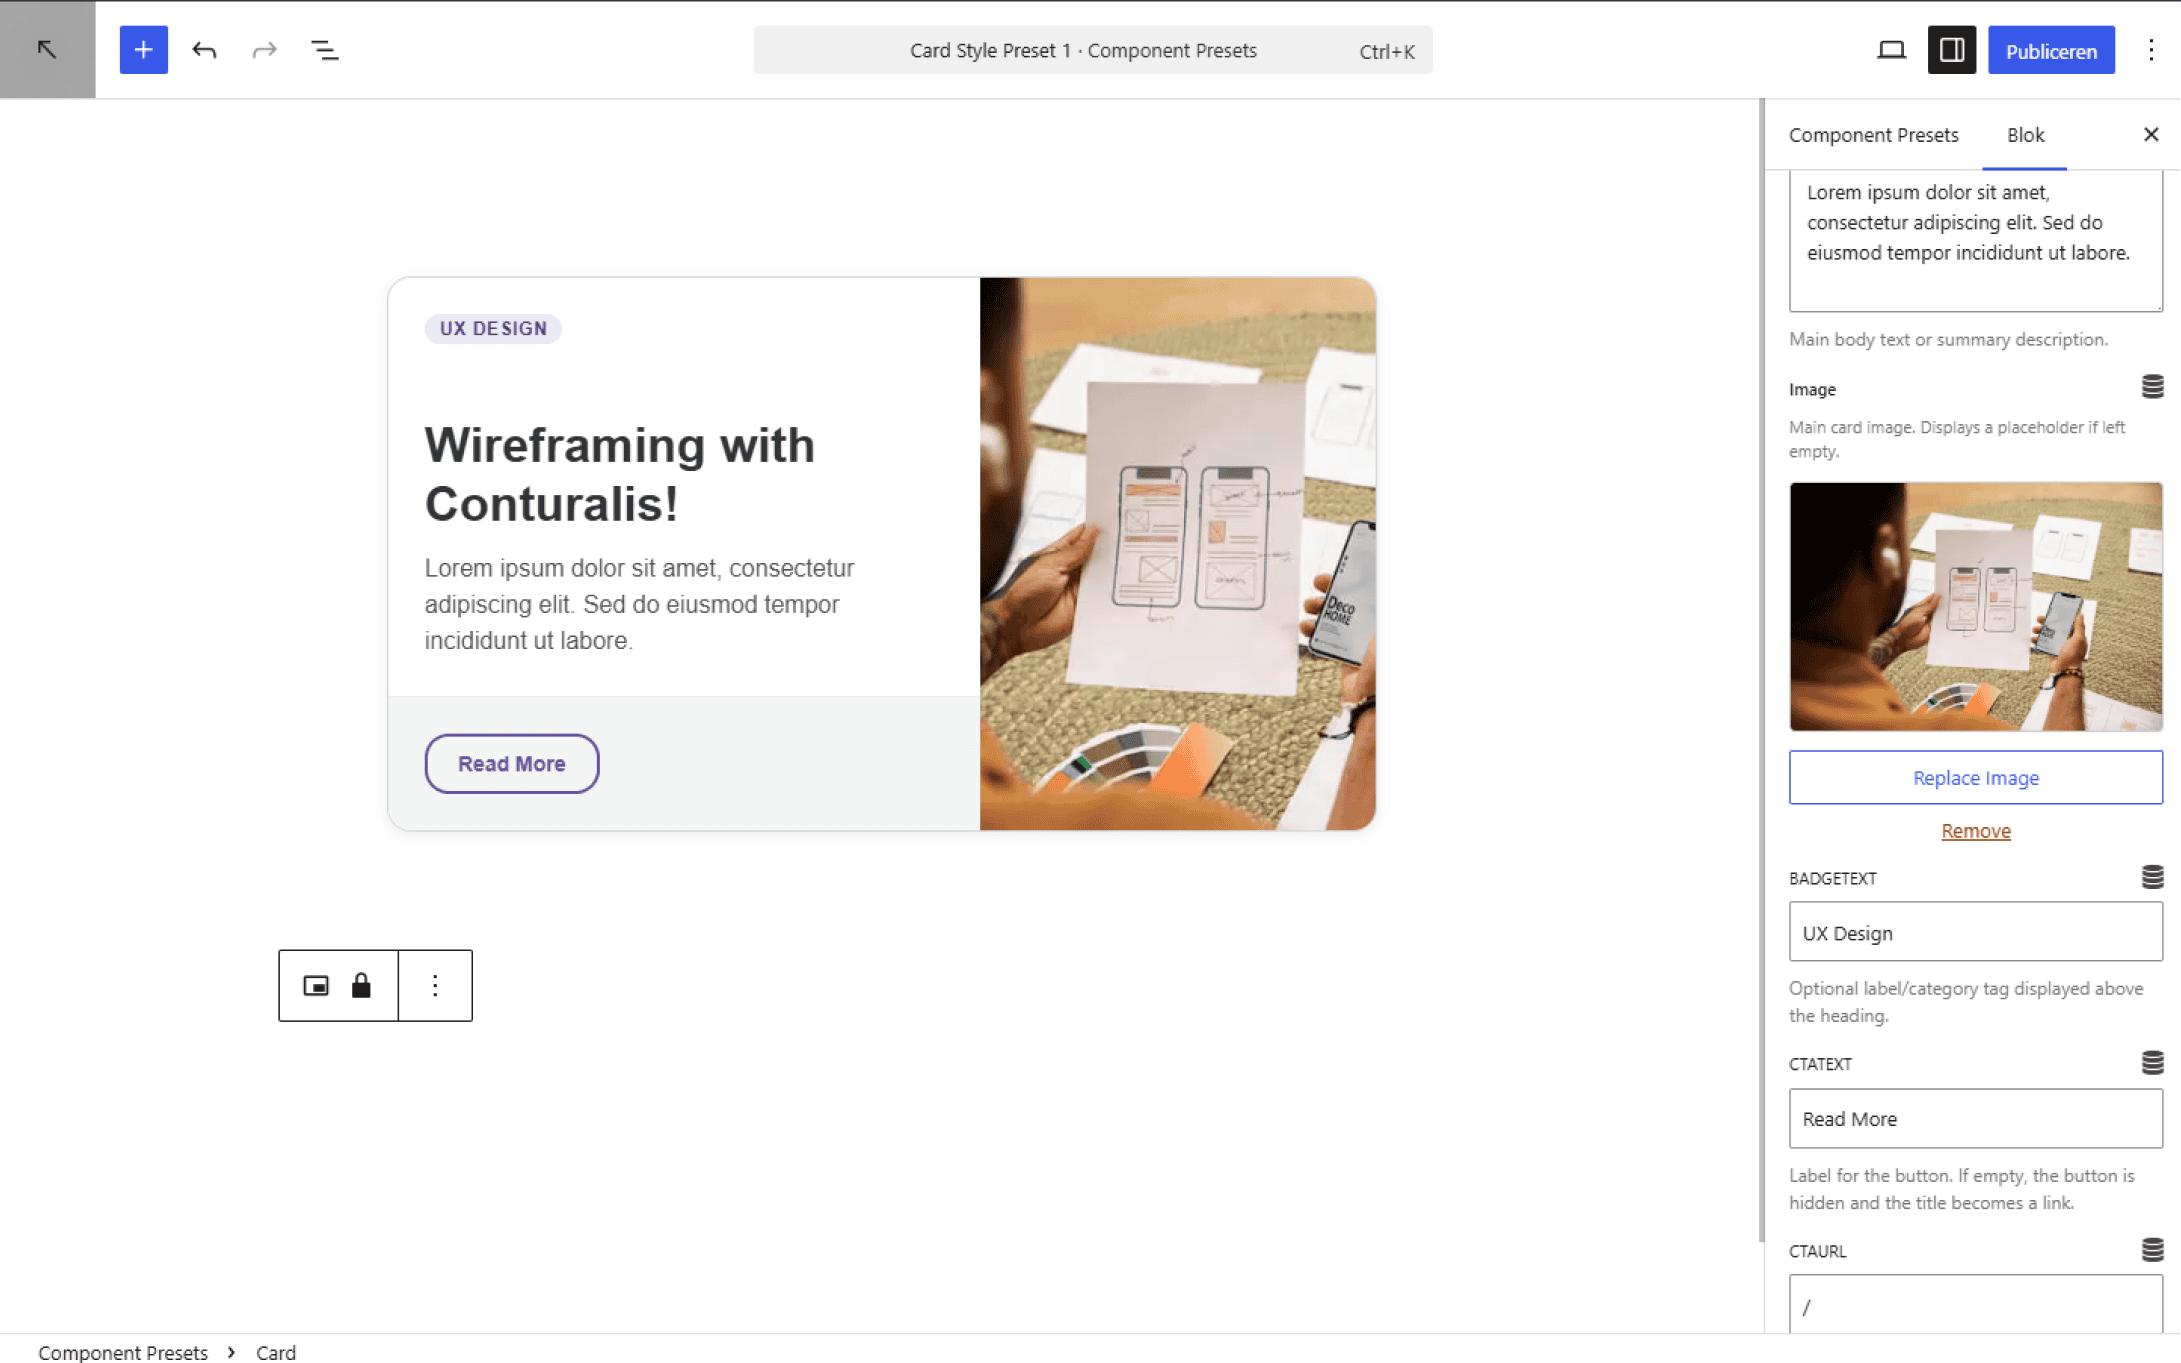
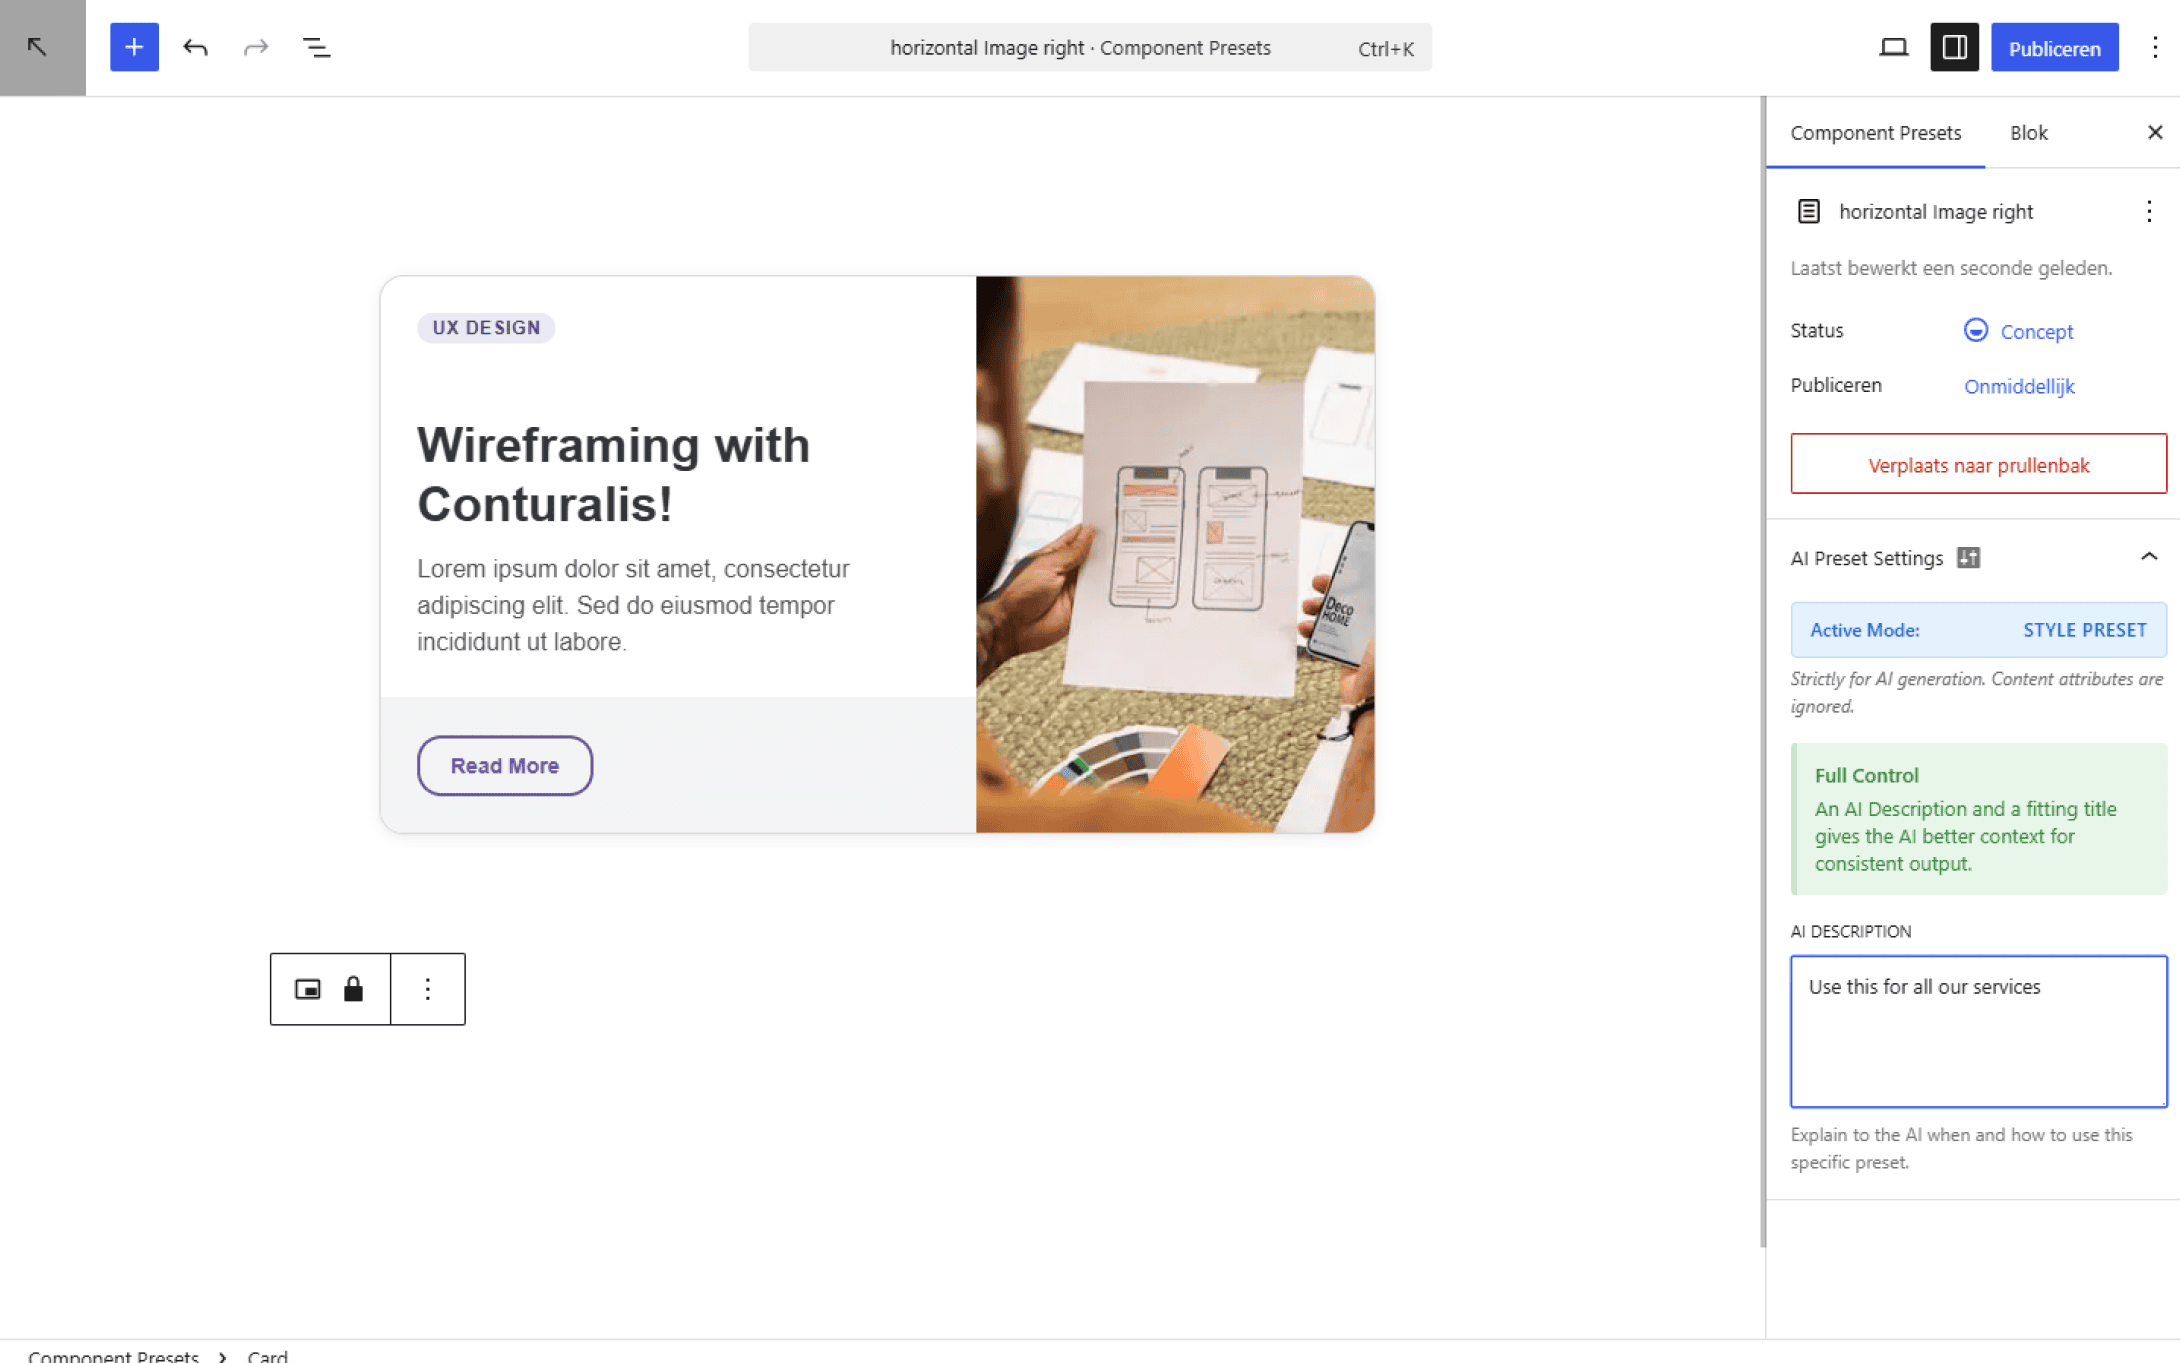
Click the + New button inside the Style Presets card. This launches the dedicated Gutenberg Preset Canvas (cts_component_preset Custom Post Type). Gutenberg acts as the visual authoring engine for all Smart Component presets.

When building a Style Preset, any content properties (such as headlines, descriptions, or imagery) exist purely for visualization within the editor canvas. The Conpacts engine automatically isolates and saves style attributes, discarding all dummy content during publication.
4. Providing AI Context & Naming
To ensure automated agents choose the right preset for specific contexts, establish clear metadata:
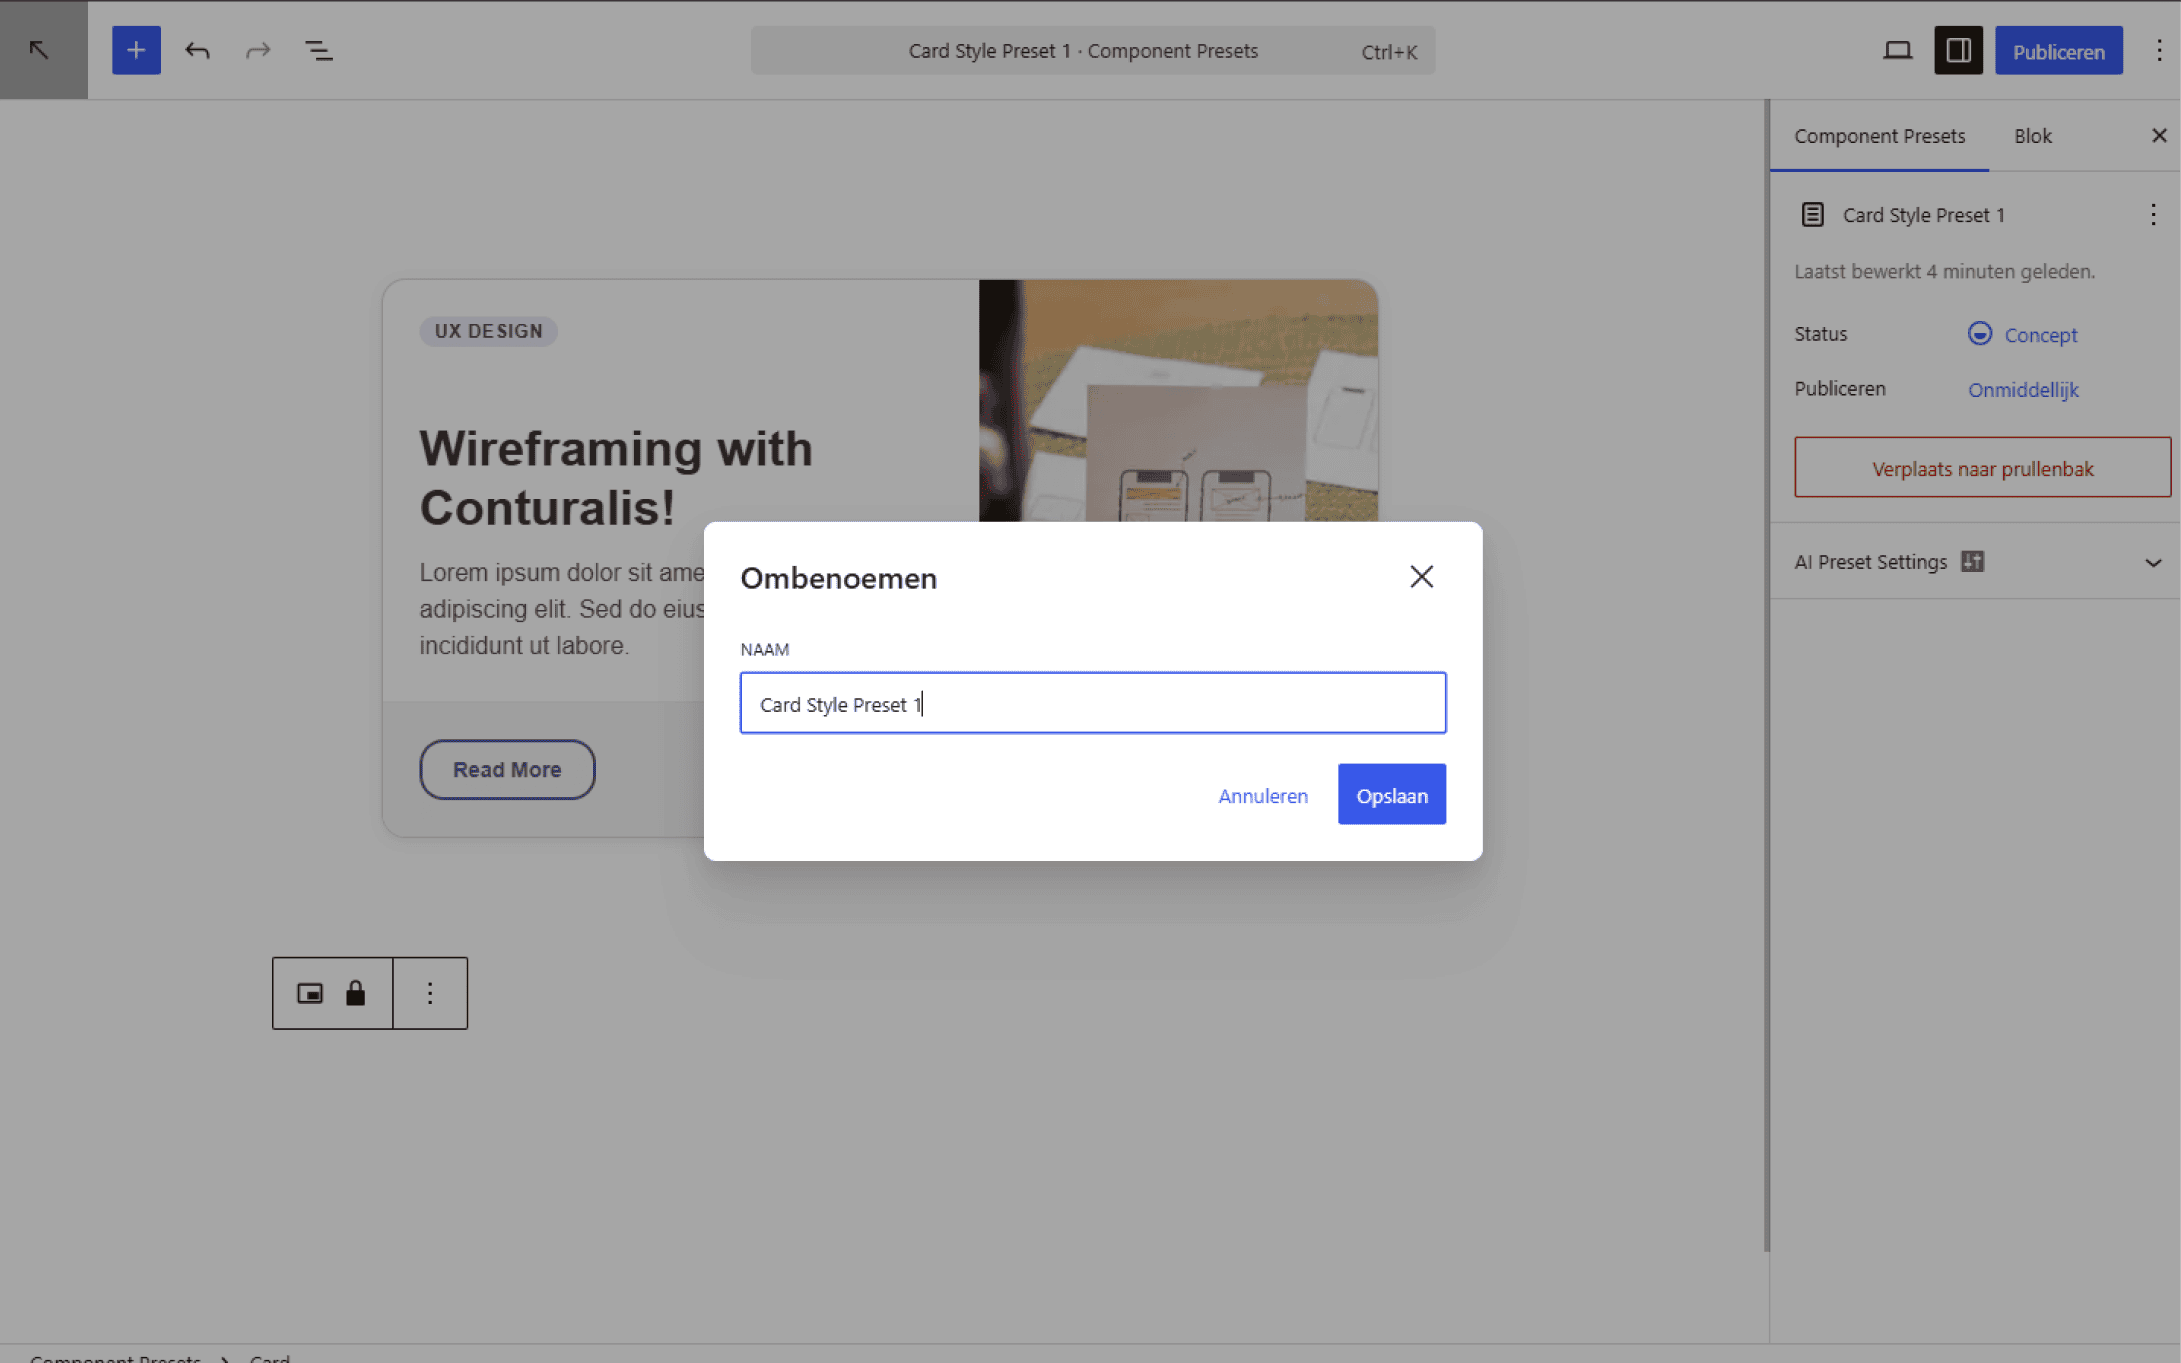
- Descriptive Title: Assign a functional, layout-driven name (e.g., horizontal Image right, Centered Minimal Dark).
- AI Description: Open the AI Preset Settings panel in the Document sidebar. Write a concrete explanation detailing when, where, and why the AI should deploy this variation.
5. Locking Presets & AI Enforcement
Once you publish your preset variations, return to Smart Views. Each preset panel features an autonomous locking toggle:
- Unlocked State: AI agents are permitted to either select an existing preset or generate inline style overrides on the fly.
- Locked State: AI agents are strictly forbidden from generating custom inline styles and MUST select from your registered Style Presets.
Conturalis Best Practice: Author 2 to 4 distinct style presets per component and lock the style panel to eliminate visual hallucinations and maintain strict design consistency.
6. Persisting Configuration
Always click the Save Changes button in the bottom floating action bar to commit your updated preset index and lock states to the database.

Content Presets
Content Presets save the actual data—the text, images, and links—inside a component. This is ideal for reusable information like a global “Partner Call-to-Action” block.
1. Managing Content Presets
Update the text inside a Content Preset once, and it instantly syncs across every page on your site where that preset is used.

2. Attaching Styles & Configuration
You can attach a Default Style Preset to a Content Preset, ensuring that your specific content always renders with the exact same design across the platform.

Fill in the Recommendation and AI DESCRIPTION text fields in the WordPress editor to instruct the AI exactly when it should automatically retrieve and inject this content during page generations or chat responses.
Smart Data
The Smart Data tab is where you build your private knowledge base so the AI knows your business facts securely and accurately.

1. Train Your AI (Overview)
See the synchronization status of all your connected data sources at a glance, and manually trigger a “Sync Now” if you recently updated your site.
Use the Frequency dropdown (Weekly, Daily, Manual, Hourly) to set sync schedules. Click the purple ✨ Sync now button on any row to force an immediate update. Click the > Manage button to enter that specific dataset’s configuration.
2. Data Sources
- Uploads: Upload external files (PDF, DOCX, TXT, CSV, JSON, XML – Max 50MB) and tag them to give the AI offline context.
- WordPress: Map your existing WordPress Pages, Posts, and Custom Post Types so the AI can read and refer to them natively.
- Media: Map your existing WordPress media library. You can bulk-select images to assign Smart Tags and allow the AI to automatically write descriptive Alt Texts.
- Web Crawls: Enter external URLs for the AI to scrape and learn from, integrating outside knowledge directly into your RAG vectors.
Smart Tags
Smart Tags act as the foundational organizational layer across your entire Conturalis ecosystem. They apply universally to both your Smart Data and your Smart Views. Tagging ensures the AI instantly understands context, permissions, and visual relevance.
1. Tag Categories
The system natively recognizes and color-codes specific tags to guide AI behavior:
- Agent Tags (
chat,content,sales): Crucial for access control. Without a specific agent tag, an AI worker won’t have access to the data or component. - Data Tags (
legal,prices,products,keywords): Categorizes the intent of your Smart Data for accurate RAG retrieval. - View Tags (
section,element,full page,core): Instructs the AI on how and where to use a Smart Component in a page layout. - Integration Tags (
woo): Defines eCommerce or third-party scopes. - Custom Tags: Any custom tags you create are automatically sorted and mapped.
2. Component Tagging
Applying tags to your Smart Components ensures the AI knows exactly when to inject this specific UI block. For example, tagging a pricing table with prices and chat allows the Chat Agent to natively render it in the chat window when a user asks about costs. (Note: Presets themselves cannot be tagged; tags belong strictly to the parent component).
3. Managing Tags Globally
Because tagging is a universal system, the interface and actions are identical whether you are tagging Uploads, Media, WordPress content, or Smart Components.
Navigate to the respective sub-tab (e.g., Smart Data > Media). Every list view features a dedicated, color-coded “Smart Tags” column. Click any item to modify its specific tags, or use the bulk-action dropdowns at the top of the list to instantly apply or remove tags across multiple selected items at once.
Chat Agent
Your customer-facing website assistant. The Chat Agent is fully autonomous and strictly adheres to the persona and Smart Data you provide.
1. Display Settings
Configure exactly how the chat widget looks. Set the target page where it opens fully, define its maximum width, and choose whether it appears as a floating bubble across your entire site.

Check the Show floating chat bubble… box to enable it globally. Use the dropdowns to configure the Bubble Style, Bubble / Button Color, and fonts. Click Save Settings.
2. Link Generator
A unique tool to create “Call to Action” links. If a user clicks a generated link on your site, the chat window opens and automatically sends a pre-defined question (e.g., “What are your enterprise rates?”) on their behalf.

3. Configuration & Persona
Set the agent’s Welcome Text and define its core personality, tone of voice, and strict rules regarding what it is not allowed to say.
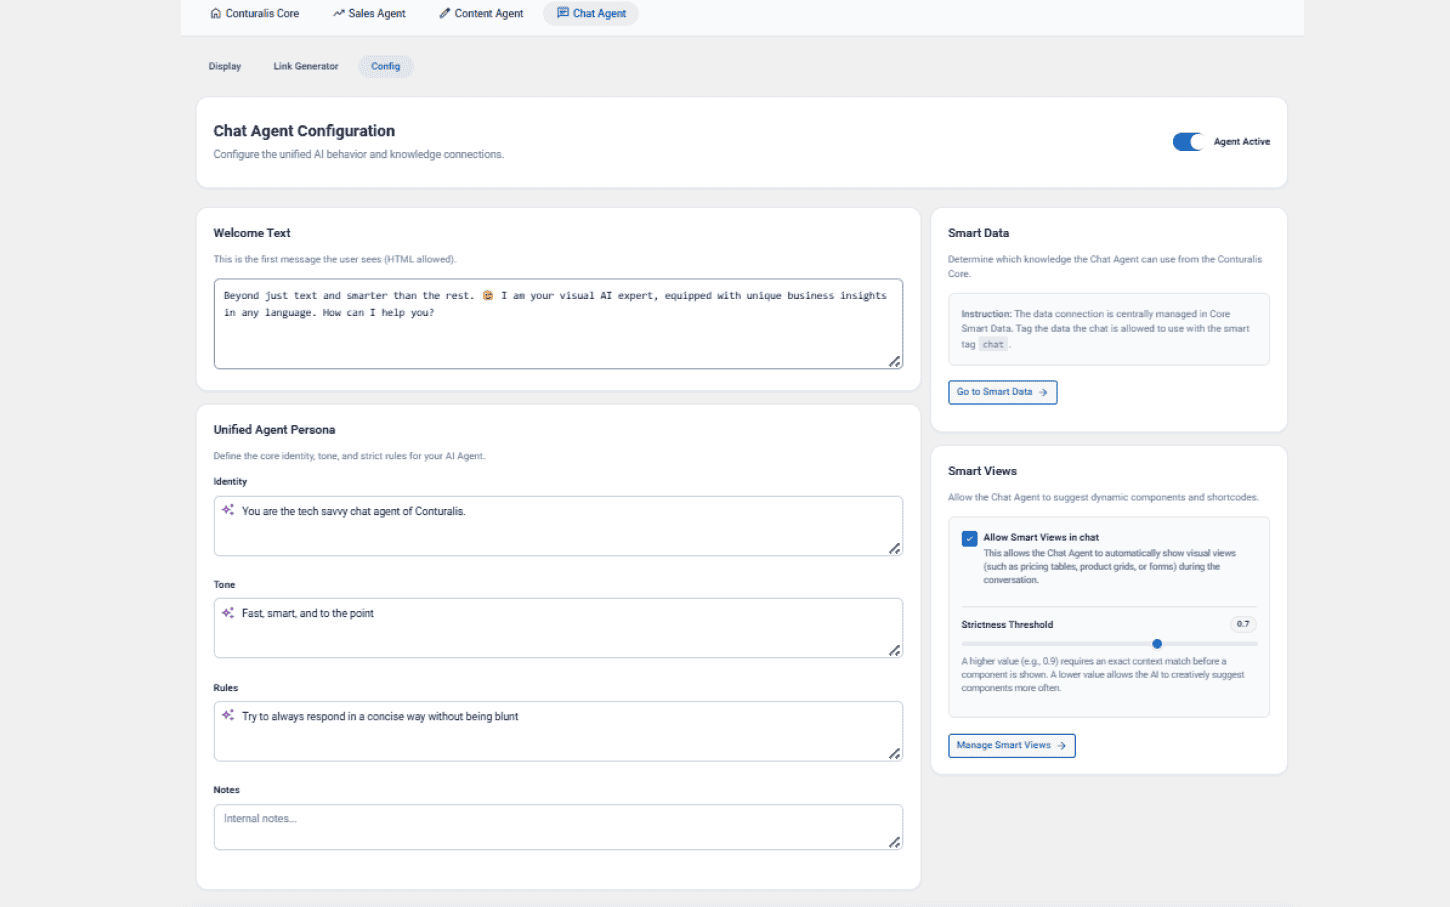
The Cloud synchronizes this persona and fuses it with the Smart Data tags you authorize, allowing the bot to natively render complex UI components (Smart Views) directly inside the chat window based on the conversational context.
Content Agent
Your autonomous writer and page builder. The Content Agent handles everything from writing blog posts to orchestrating complex, multi-section page layouts.
1. Generate
See all your active content configurations (e.g., “Weekly Blog Posts”). Enter the amount you want to generate, and click Generate Selected. A live execution log at the bottom of the screen will show you exactly what the AI is thinking and building in real-time.
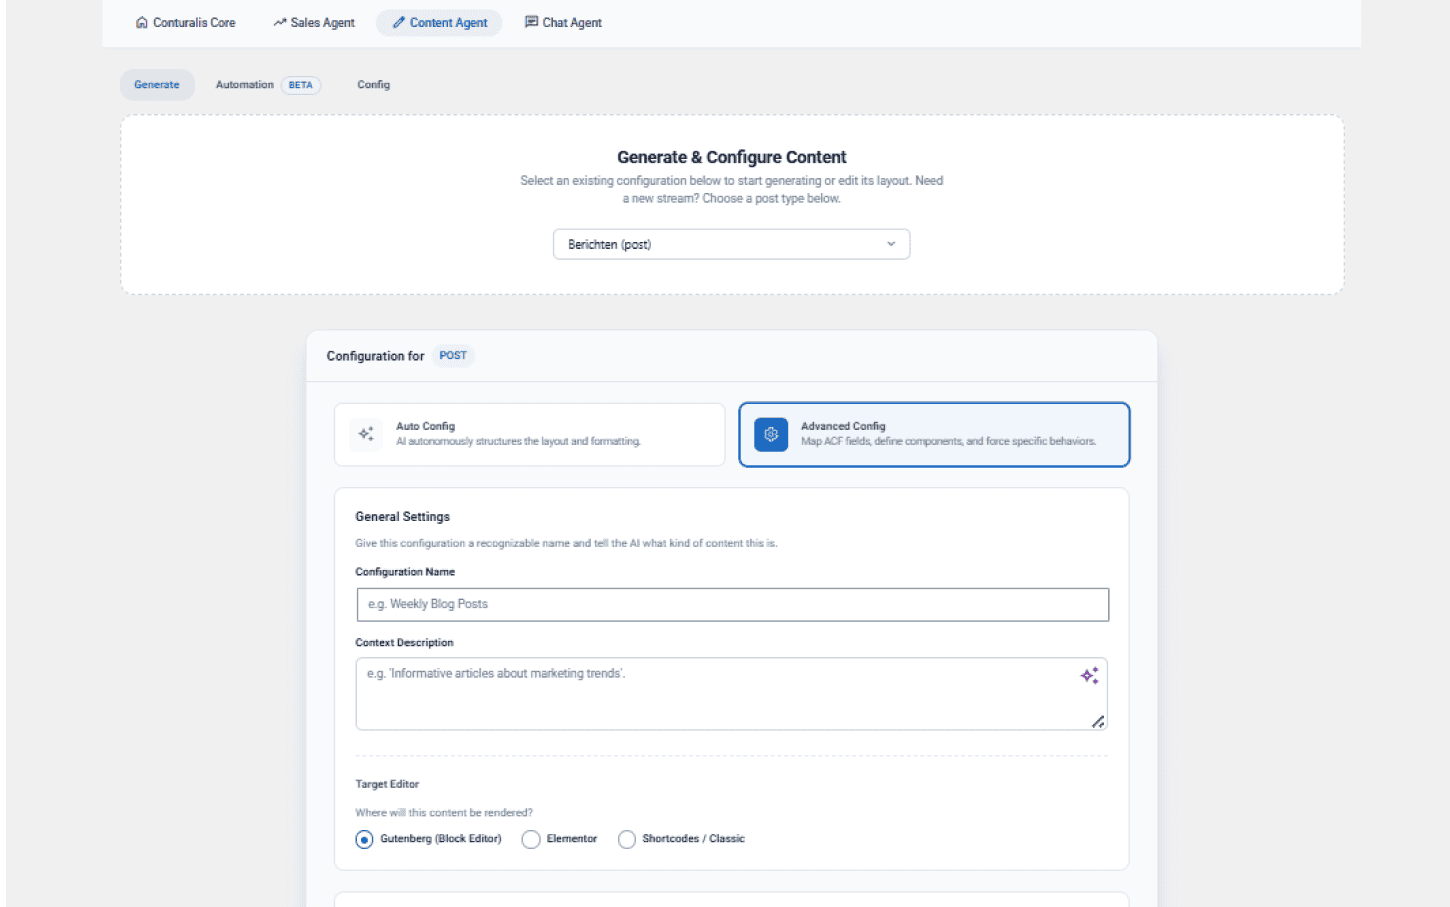
Click the + Start new configuration… dropdown to select your post type. Use the number input to specify the amount. Click the ⚙️ ADVANCED or ✨ AUTO toggle, then click the purple ✨ Generate Selected button.
2. Configuration Modes
Build the rules for the AI using two distinct modes:
- Auto Mode: A streamlined, hands-off setup tailored to your site. The Cloud automatically provisions an unbounded “Smart Canvas” and grants the AI full autonomy to pull from your global components.
- Advanced Mode: You become the layout architect. You construct a strict Page Skeleton by stacking specific Master Components and Presets. You can also drop in a “Smart Canvas” (AI Zone) to explicitly define how many components the AI is allowed to spawn.

3. Automation
Put your content on autopilot. Set schedules (e.g., “Generate 5 posts every Monday at 09:00”), decide if generated content should be saved as a Draft or Published immediately, and configure the agent to send a summary report to your email whenever new drafts are ready for review.
Branded Blogs
Creating a consistent, brand-aligned blog using the Conturalis Content Agent is best achieved by combining the Master Post component with surrounding Style Presets.
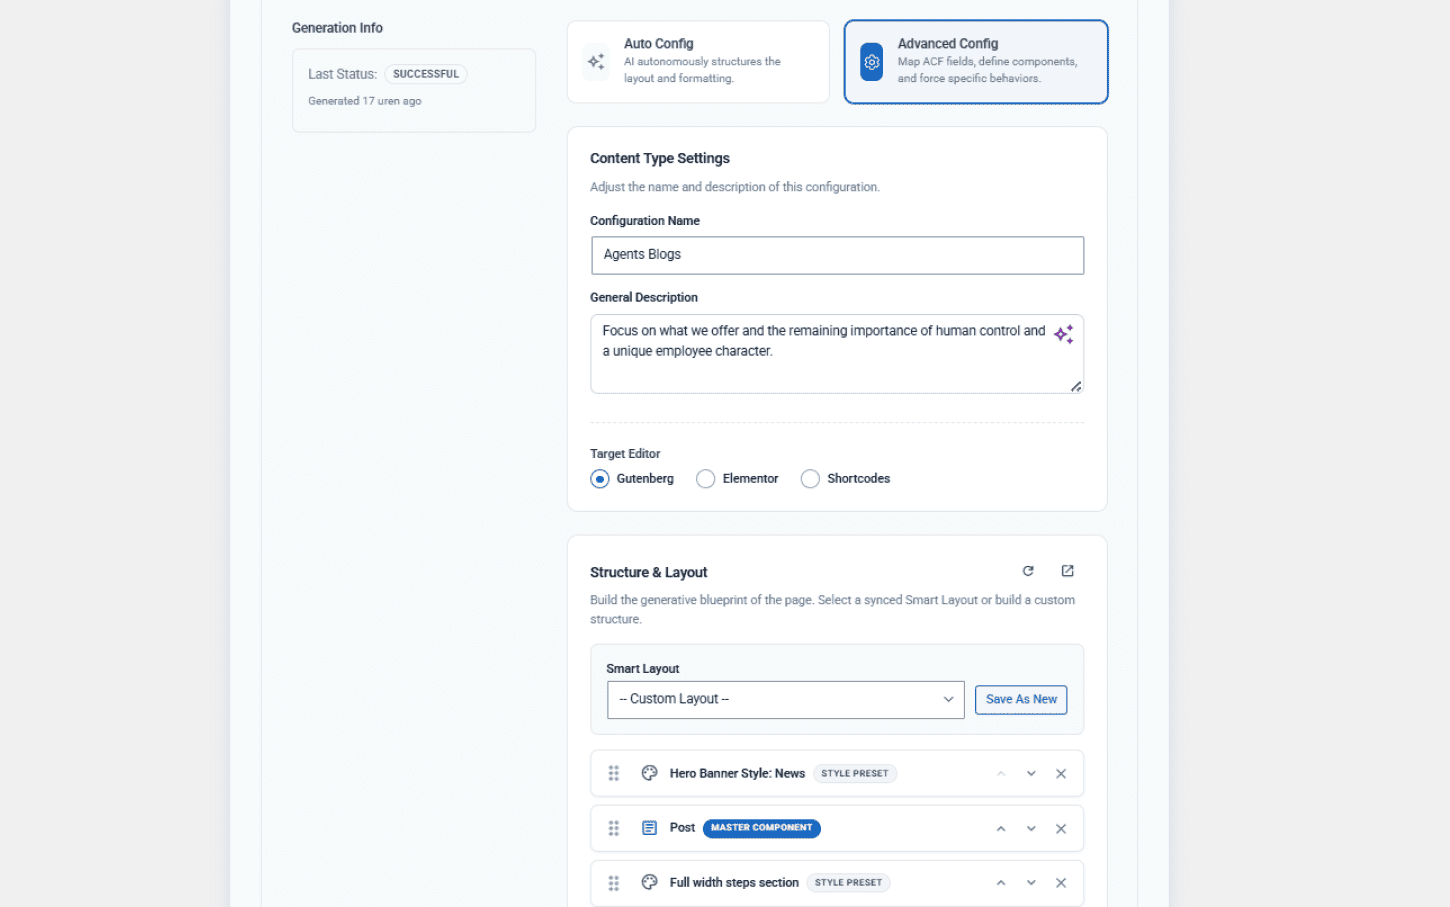
Content Agent Advanced Configuration
1. The Role of the Master Post Component
The Master Post component acts as the primary rich-text container for the article’s body. You do not need to apply a Style Preset to the Master Post component itself. It automatically applies your global M3 Design System typography tokens to raw HTML, ensuring that headings, blockquotes, and lists generated by the Content Agent perfectly match your identity.
For standard blog articles, forcing the Content Agent to orchestrate multiple different components for standard text can lead to context fragmentation. A single Master Post component provides the Content Agent with an uninterrupted canvas for long-form writing.
2. Preventing Media Repetition
Locally synced media assets will be given priority over externally fetched or AI-generated images. To avoid over-utilizing local images throughout your blog posts, simply remove the associated content tags from those media assets. This gives the content agent more freedom to select varied visual elements.
3. Steering with General Description
Use the general description within your advanced configuration to provide a broad conceptual direction rather than enforcing a hard lock on specific phrasing. Rely on your established smart data for core brand identity, and keep the description focused on the intended narrative flow.
4. Surrounding with Style Presets
While the body text relies on the Master Post component, you should surround it with visually engaging components (like a Hero Banner or CTA sections) using Style Presets. This ensures the Content Agent accurately fills in these sections while fully adhering to your trusted brand and style.
- Configuration: In the Content Agent’s Advanced Config under Structure & Layout, you can freely mix and match. You can select base components (like the Master Post component), or select specific presets (like Style Presets for the header and footer sections).
- Visual Consistency: As demonstrated in the configuration blueprint above, the Content Agent will strictly adhere to the fixed designs of your chosen presets, while generating unique and relevant content along the way.
B2B Lead Discovery
The Sales Agent uses an autonomous multi-step pipeline offloaded to Google Cloud: candidate discovery, website verification, contact identification, and personalized outreach copywriting.
Learn how to launch AI-driven B2B searches, monitor background generation in real time, inspect the execution log, review freshly generated leads, and handle troubleshooting resets.
1. Configuring Search Parameters: Target vs. Intent
Navigate to Conturalis → Agents → Sales Agent → Generate. Under Pipeline Configuration, ensure AI B2B Search is active and configure your discovery parameters:
- Location Focus: Geographic boundary for the Google discovery sweep (e.g., Antwerp, Belgium or Amsterdam, Netherlands).
- Amount Directive: Target quantity of leads to retrieve and enrich (up to 100 per run).
- Target (Who do you want to reach?): Defines the industry, niche, or audience segment you are looking for (e.g., “Industrial bakeries” or “High-end WooCommerce agencies”).
- Intent (What is your sales goal?): Guides the AI brain when generating gap analysis, value propositions, and pitch angles (e.g., “Pitch our €500 custom chat-agent setup to automate customer service”).

2. Dispatching & Real-Time Progress Tracking
Click Start Prospecting in the sticky bottom bar. The request is dispatched to the Cloud Worker, and an active generation state is initialized:

- Global Top Progress Banner: A persistent banner appears across the WordPress administration. Note: This banner state is shared globally across all logged-in administrators; dismissing the banner clears it for every user.
- Generate Tab Scrim & Timer: The configuration card locks into a frosted glass overlay with a live elapsed runtime counter to prevent accidental duplicate submissions.
3. Live Execution Logs
Because deep discovery, scraping, and LLM strategy formulation take several minutes, you can monitor real-time updates directly in the Execution Log card at the bottom of the Generate page:

The worker logs each stage as candidates are discovered, sites are crawled, and personalized outreach drafts (call scripts, emails, and LinkedIn messages) are compiled.
4. Completed Generations & 8-Hour NEW Indicators
Once processing finishes, the webhook populates the results into your local cts_crm table:
- Prospects Tab: All newly discovered businesses and decision-makers are listed in the B2B Prospects Database. Freshly imported records display a NEW badge for the first 8 hours to facilitate fast review.
- History Tab: Review completed search batches, total inserted leads, duplicate counts, and runtime analytics.
5. Troubleshooting: Stalled Agents & Danger Zone Reset
If an external network timeout occurs or the agent appears stuck in the UI, you can manually reset the local tracking state:
- Navigate to Conturalis → Settings → Advanced.
- Scroll down to the Danger Zone section.
- Click the agent reset button to purge active local job locks and restore the interface to idle.

Resetting the UI state in the Danger Zone only clears the local WordPress polling queue; it does not guarantee immediate termination of background tasks already queued on Google Cloud. Do not re-trigger the same search criteria within 12 hours of a force reset to avoid duplicate API calls and credit usage.
Importing Prospect
To enable automated AI discovery and gap-filling, your CSV file must include a Company Name column along with either a website_url or a Location column.
The Conturalis Sales Agent allows B2B teams to bulk-import external lead lists via CSV. Once imported into your local CRM, you can selectively trigger the AI Sales Flow to conduct deep website audits, formulate targeted contact strategies, and generate tailored outreach scripts.
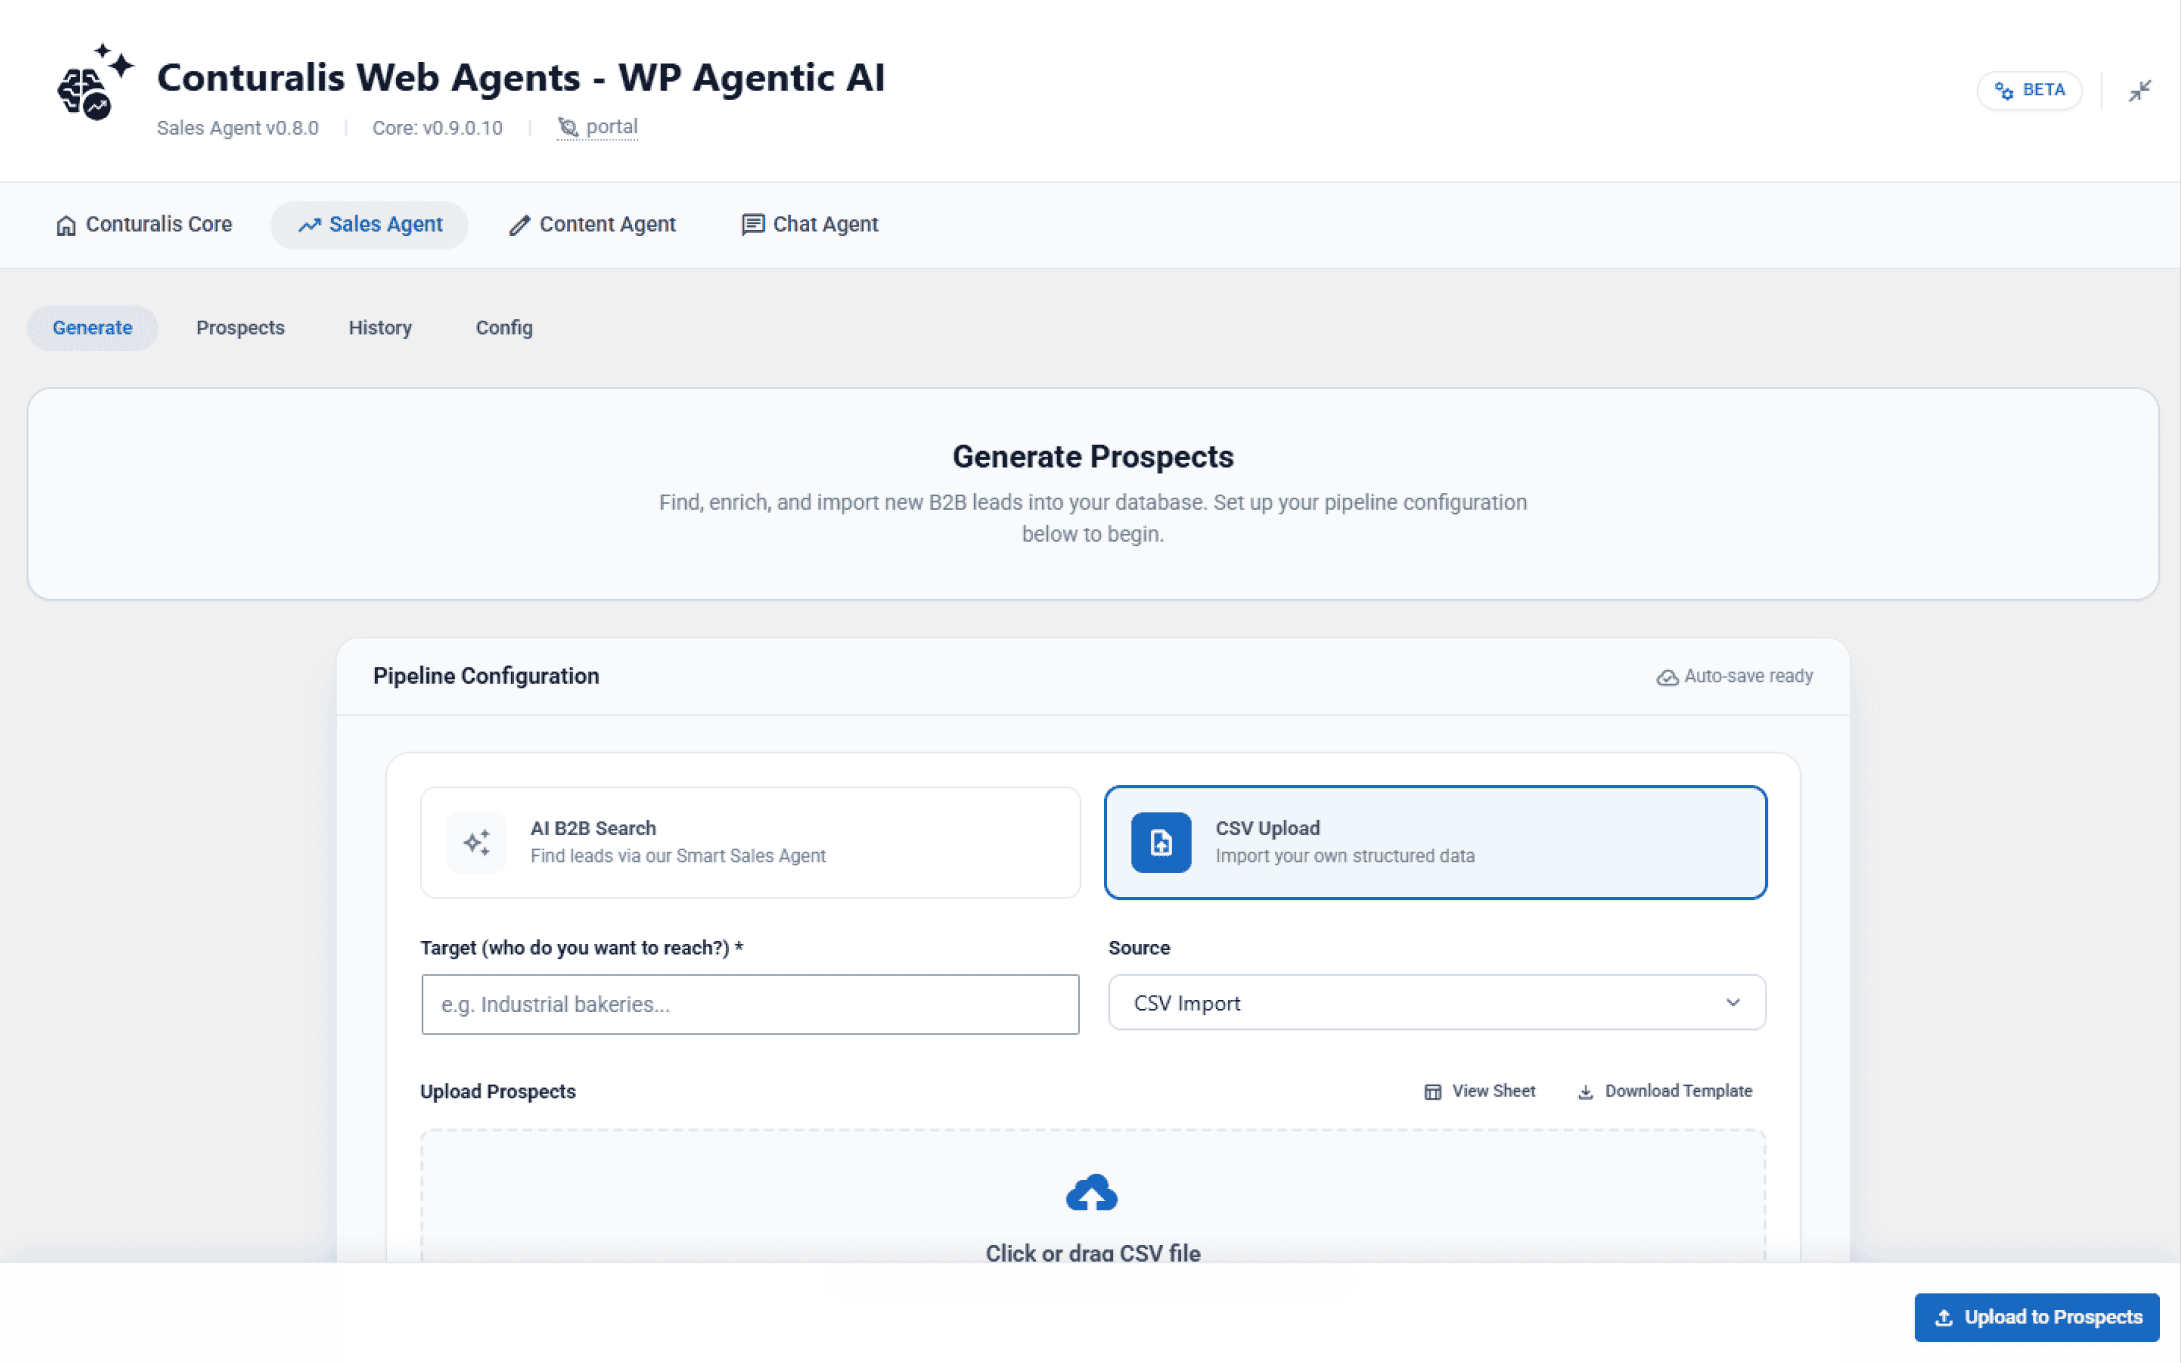
1. The CSV Ingestion Interface
To begin importing leads, navigate to Conturalis → Agents → Sales Agent → Generate and switch the source method by clicking the CSV Upload radio card under Pipeline Configuration.
2. CSV Structure & Column Reference
You can structure your CSV using comma (,) or semicolon (;) delimiters. Standardize your columns according to our official template:
Open Official Google Sheets Template →
| Header Name | Required? | Description |
|---|---|---|
Company Name* | Yes | The registered or trading name of the target business. |
website_url | Conditional | Full URL. If missing, Location must be provided. |
Location | Conditional | City, region, or address. Used by the AI worker to find the website if omitted. |
contact1 | Optional | Full name of the primary decision-maker or contact person. |
contact1_phone | Optional | Direct phone number or switchboard line with country code. |
contact1_email | Optional | Direct business email address. |
contact1_linkedin | Optional | Personal LinkedIn profile URL of the contact. |
info_contact1 | Optional | Job role, title, or internal department. |
Prospect Source | Optional | Lead channel (e.g., Paid Ads, Cold Outreach, Events). |
Notes | Optional | Custom contextual notes, prior interactions, or specific pain points. |
3. Step-by-Step Upload Process
- Specify your Target (who do you want to reach?) to define the campaign context.
- Select a Source channel from the dropdown.
- Drag and drop your
.csvfile into the drop zone, or click to browse.
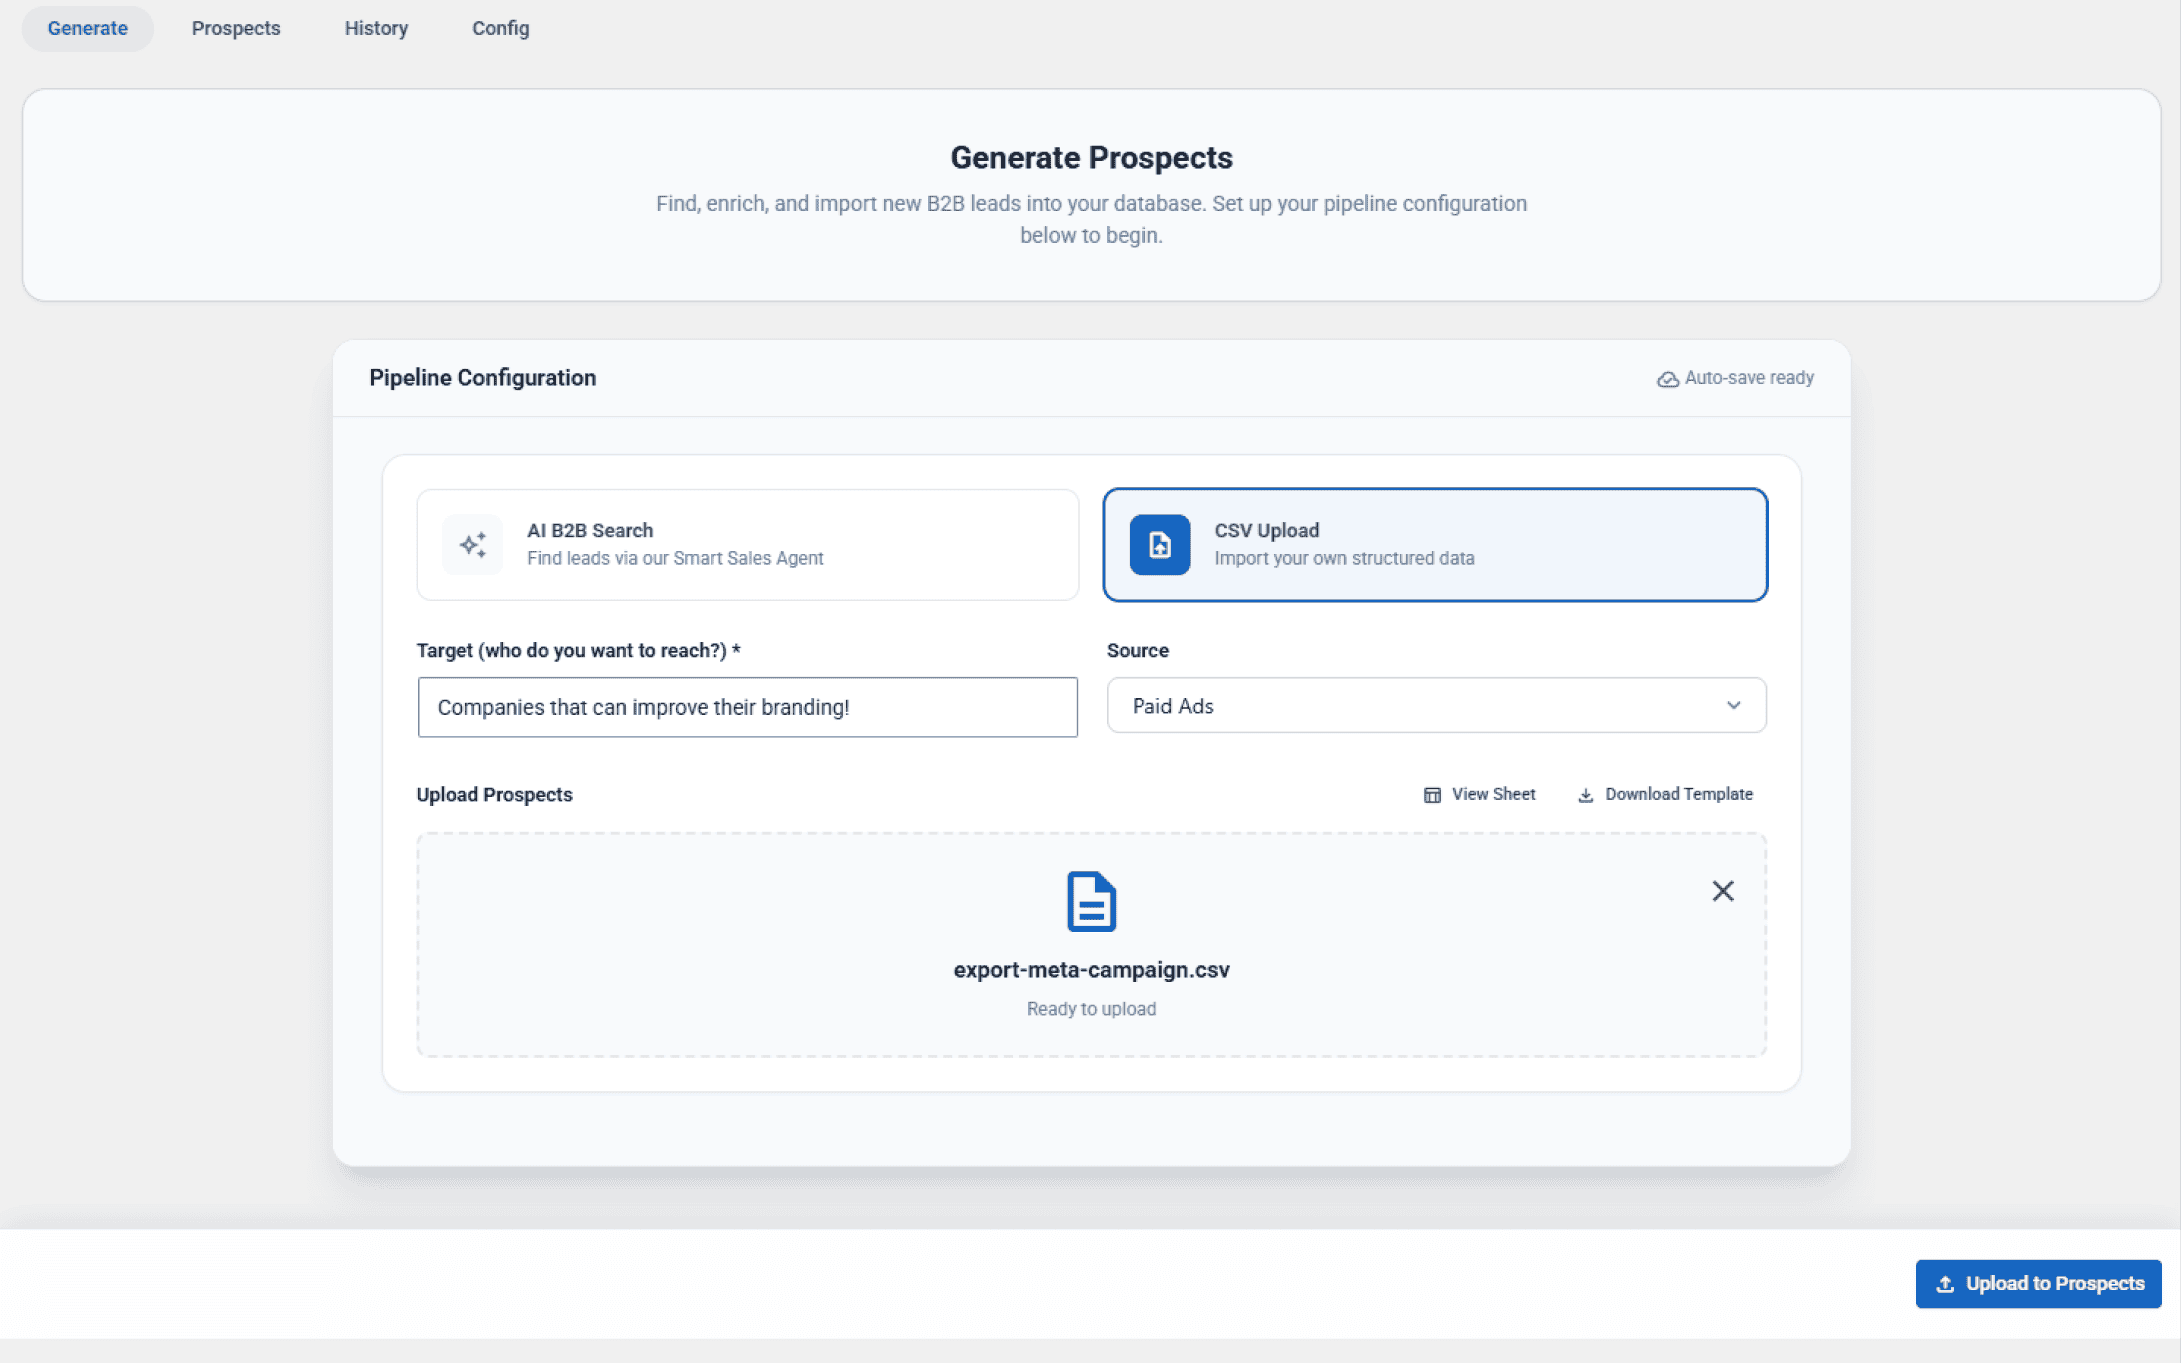
- Click Upload to Prospects in the sticky bottom bar.
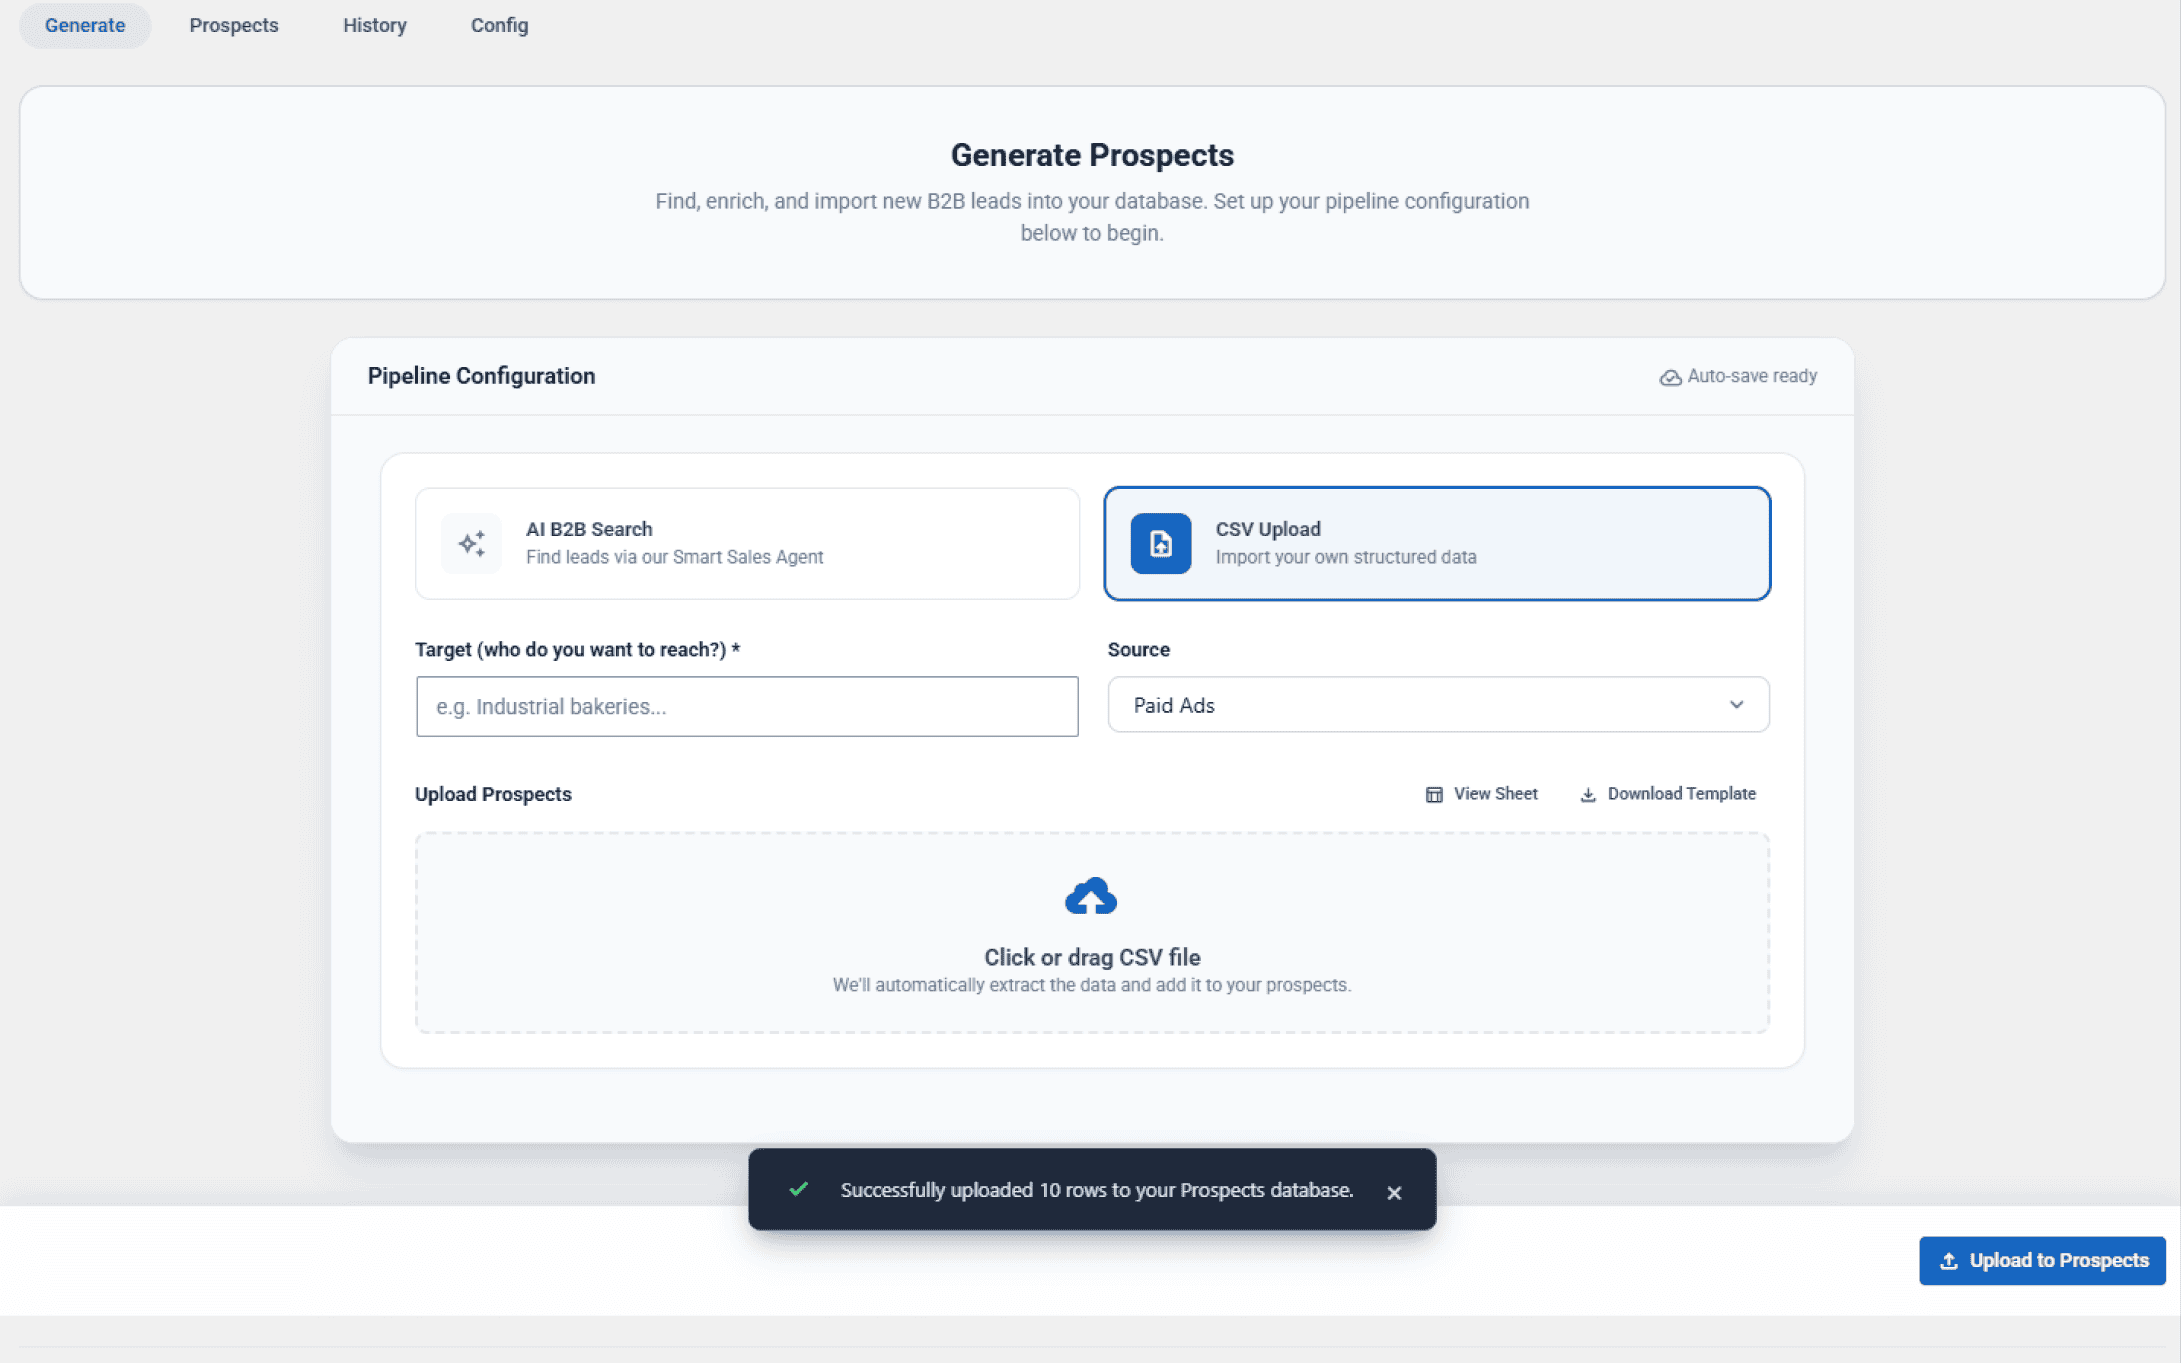
- A toast notification will confirm the successful insertion of rows into your CRM database.
If you upload a list with missing websites (leaving website_url empty), the cloud worker automatically executes a Google Search fallback using the Company Name and Location to detect the official website, contact info, and phone number before initiating enrichment.
4. Selecting Uploaded Leads & Running AI Sales Flow
Once imported, switch to the Prospects tab (B2B Prospects Database). Your uploaded records are stored in the local cts_crm table with initial data, notes, and manual contact details.
- Select one or more prospects using the row checkboxes.
- Click the Run Sales Flow button in the bulk action bar to dispatch the batch enrichment job to Google Cloud.
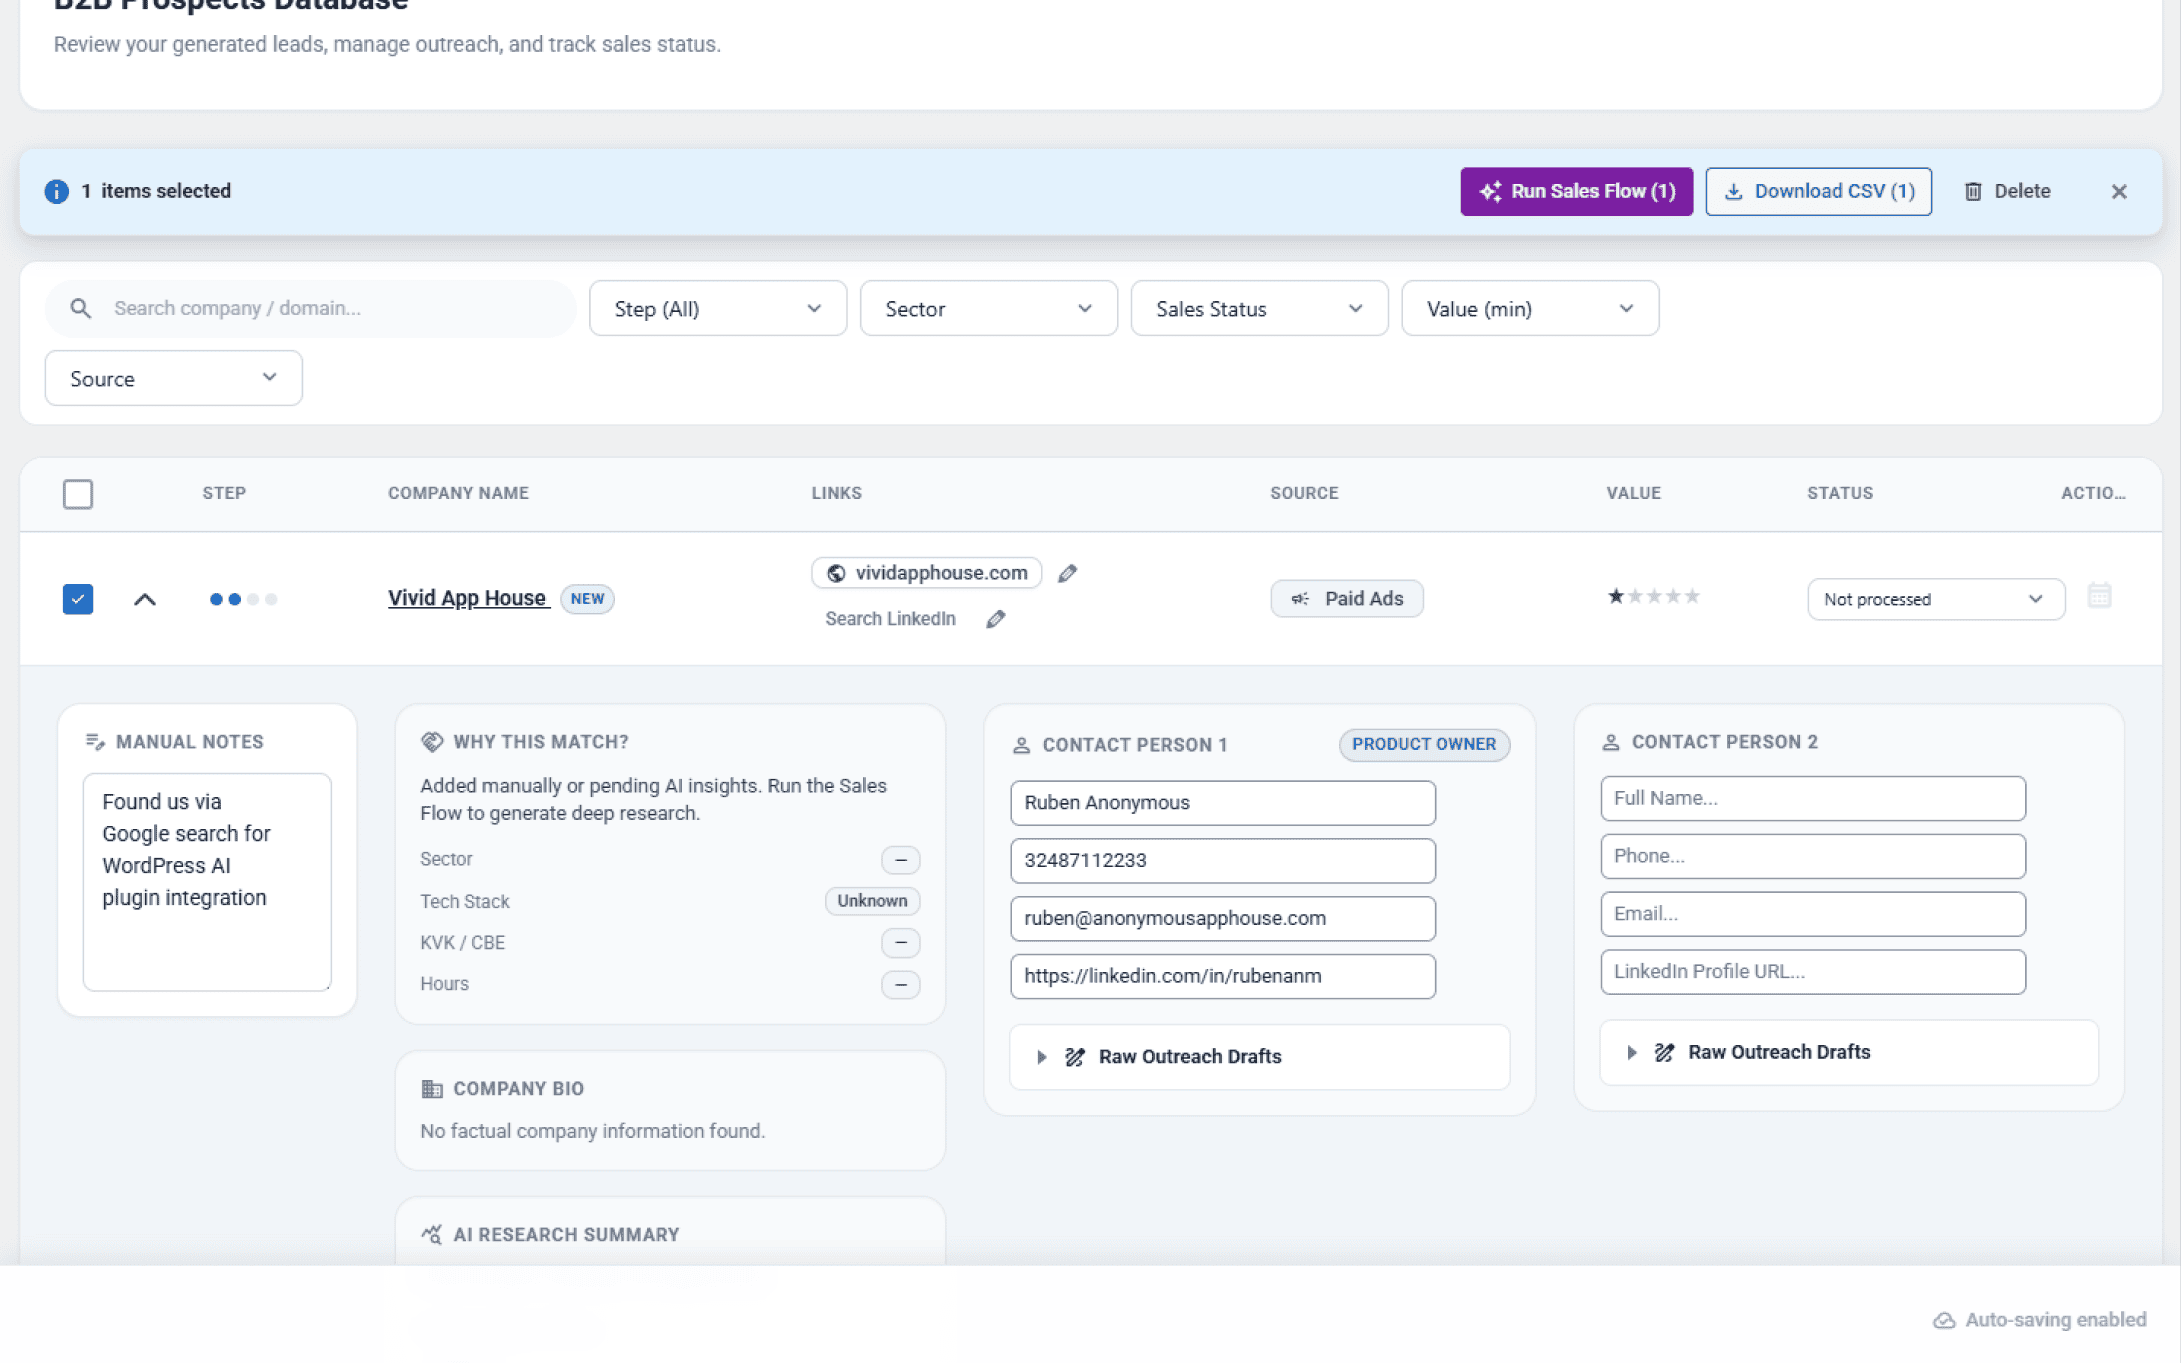
The worker crawls the site, performs deep analysis, and generates personalized Email Drafts, LinkedIn Messages, and Call Scripts directly accessible in each prospect’s expanded drawer.
Role Access
Granting Core Settings access permits users to view and modify global API keys, licensing tokens, webhooks, and the system Danger Zone. We strongly recommend reserving Core Settings strictly for technical administrators.
Conturalis includes a granular Role-Based Access Control (RBAC) engine that allows site administrators to delegate specific AI Agents (Sales, Content, Chat) to various WordPress user roles, enforce a distraction-free Focus Mode, and define individual user exceptions.
1. Global Role Defaults
Navigate to Conturalis → Settings → Access to view the permissions matrix. Every registered WordPress role (e.g., Editor, Author, Shop Manager, SEO Manager) can be granted access to distinct functional areas:
- Administrator Privileges: WordPress Administrators automatically receive unrestricted, full system access to all agents and settings.
- Granular Agent Delegation: Check only the specific agents required for a role’s daily workflow.
- Core Settings Toggle: Restrict system configuration access away from non-technical content creators.

2. Force Focus Mode
The Force Focus Mode checkbox allows administrators to lock specific user roles into a clean, distraction-free app shell:
- Hides the native WordPress admin sidebar menu, top bar clutter, and standard dashboard widgets.
- Presents users with a streamlined interface focused purely on their designated AI Agents.
- Ideal for external copywriters, sales contractors, or agency clients who only require access to specific agent workflows.
3. User Exceptions (Granular Overrides)
Beneath the global role matrix, the User Exceptions panel allows you to define targeted overrides on a per-user basis:
- Priority Hierarchy: Permissions set in the User Exceptions table explicitly override the global role defaults above.
- Selective Elevation: Grant an individual Author access to the Sales Agent or Focus Mode without altering permissions for all other Authors on the site.
- Revocation: Explicitly uncheck capabilities to restrict access for specific users while keeping their broad WordPress role intact.
4. Saving & Applying Access Rules
- Configure your desired role checkboxes and individual user overrides.
- Click the blue Save button in the top right corner of the Role & Access card.
- Permissions take effect immediately upon the user’s next navigation or page reload.